Wednesday, January 28, 2015

New Project: Gloria Patri

I've started on my next "big" project, although it's actually fairly small- I guess about 36" square.  It's another in my ongoing (still in my brain mostly) series depicting pieces of the Episcopalian/Catholic liturgy.

In this one I wanted to focus on repetitive meditative prayer, and the idea of a spiral with a firm calm center.  I chose the Gloria Patri as my text, and used the latin, "Gloria Patri, et Filio, et Spiritui Sancto, Sicut erat in principio, et nunc, et semper, et in saecula saeculorum. Amen."  In my design it spirals out on both sides.  I decided to screen print the text as I've had good luck with that in the past and I like the crisp edges it gives the letters.

One of the other things I wanted to try was designing my own ambigram for the center.  I've been intrigued by these ever since first seeing them in the Dan Brown thriller Angels and Demons.  I bought and stitched out the Arts/Crafts ambigram embroidery pattern from Urban Threads, but hadn't ever designed my own until now.  I spent quite a while sketching, and when I liked my design, I scanned it into illustrator and did the rest of the text layout there.  I use my silhouette cutter to cut my screens out of fusible vinyl and then mount it on organza.  This was by far the biggest screen I've ever attempted, and unfortunately, it required five separate pieces of fusible vinyl to get all the letters.  The biggest challenge with this was lining up the edges; in the past when I've done screens that required multiple pieces of vinyl, the text was in regular lines, so it was fairly easy to break the screen between each line.  This time though since the text spiraled, it was impossible to make a rectangular screen (the shape of the cutting mat) that didn't have letters partially on each edge.  Lining up the floppy vinyl screens was kind of a pain. Finally I got the screen all put together though.

Vinyl on organza silk screen.


For my background, the original idea was to use various different types, colors, and textures of white.  I even wanted some of the printing to go onto the batting.  I therefore pieced this background (with minimal piecing since printing over seams is tough) and got ready to print.  I also decided to use multiple colors- gold silver and white, with the writing getting lighter and more chaotic towards the edge.


Well, this was the first printing.  What a disaster!


The paint smeared terribly under the screen, the seams were problematic and the colors looked terrible.  I identified several specific problems, all of which were things I already should have known better about.  First, it really is important to use screen printing ink or something with thickener.  It doesn't take much runniness in the paint to prevent a good print (the gold paint I used on this try was fabric paint but not screen printing paint).  Second, seams really are a problem if the goal is a super crisp print.  Third, large screens (like my 36 x 36 one) are a no-no, especially without a frame.  My screen didn't even lay flat because of how I'd had to squish the vinyl- so I should have known I wouldn't get a good print.

So I washed out the screen, picked a single piece of background fabric (a white polyester bengaline) and started cutting up the screen into several parts.  I also switched back to the silk screen paint.

Print of the first section, much crisper:


Here's the second piece of screen taped down in mid-print:


And finally the last section of screen, taped down in mid-print:


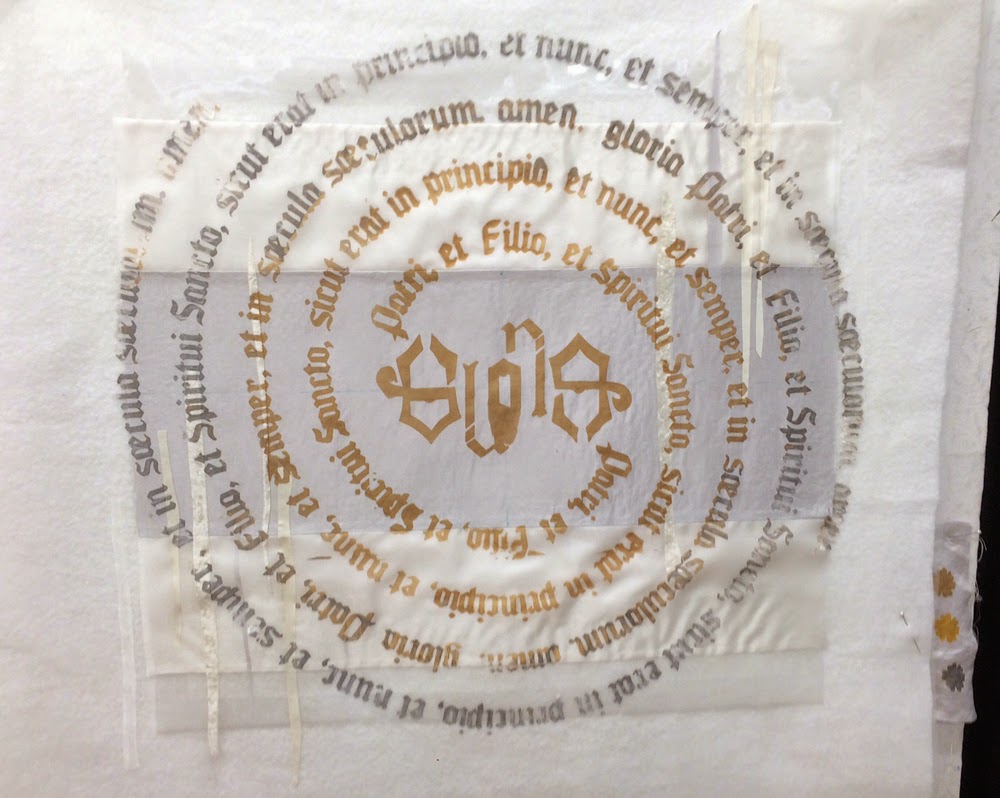
The part with the ambigram is the central gloria.  You can see what I mean in the next two pictures:  they're taken from opposite sides of the table (but the print looks exactly the same).


This second round of printing went much better.  All the letters are nice and crisp with only a few spots where the paint didn't transfer well.  Much better to transfer too little though than too much.  Up next- how to quilt it!

Linking up with Nina-Marie and WIP: Wednesday.


Monday, January 26, 2015

Mat for the Game Table

My grandfather gave me his lovely cherry wood game cabinet a couple of years ago (for storing not playing games).  It's the size of a large end table but in my previous living room's organization it didn't fit, so it'd been hidden away in our bedroom.  Recently though, I reorganized the furniture in our living room in an effort to have a lamp (a harder task than I might have imagined) and the cherry wood table is now out for all to enjoy.  When I got out my Christmas decorations I found a ~15" square miniquilt I made a few years back and just set it out on the game table.  I liked the way it looked so much that after I put away the Christmas decorations I decided to make something new for that space.  It was a fun little project and I got to use some of one of my favorite prints.

I fussy cut these 30 degree diamonds and tried them both ways.


I decided on that first arrangement because I knew I wanted to add some skinny blue sashing around each point so I thought the blue flowers should be near the middle.

Add some white background, fun quilting, and ta-da!  It makes me feel like spring is coming.


I'm linking up with the lovely ladies over at Quilt Story.

Wednesday, January 14, 2015

Completed Afghan

Well, almost exactly two years (ouch) after my last post about it, and who knows how long after I actually started, I'm here to say my granny square sampler afghan is done!  I wish I'd gotten it pinned up more square.  The blocks mostly came out of The Granny Square Book.  There are lots of repeat blocks and a few where I kind of did my own thing.  Many of them have extra dimensional flowers crocheted on top.  It really is a sampler- no real unifying color scheme and no real unifying block theme.  Probably I should have stuck to either a color scheme or just one or two blocks but that's ok.  It's eclectic and colorful which makes me happy.  It's pretty large, about 85" x 65".


Here are a few close ups of the blocks.  I'm really fond of both of these.


The big yellow one here was one I made up, and it really is very floppy.  I had to pin up all those petals to even photograph it.


Even though they're all granny squares, they were really all the same size, and there was a whole row of big white ones in the middle that didn't require as many blocks to make the row.  I just sort of eased them all together.  I think a crochet judge would really ding me, but this definitely isn't for show.


I was going to block it more square after washing, but alas things went awry. First off, I used cotton washcloth yarn for the whole thing.  I would NOT recommend this for an afghan.  It's really heavy and not as soft and snuggly as you'd like for an afghan.  Then, the pink yarn bled all over the white when a couple blocks got wet.  So I put it in the washer for a couple of cycles with some dawn to try to get out all the extra dye (like you would with a quilt) but I guess it didn't like that because one of the yarns really really disintegrated and left giant giant clods of linty bits all over the whole quilt.  Several others were also pretty bad.  In spite of long tails that were woven in, in several places the yarn had actually worn away leaving bits floppy and really messed up.  I'm not sure why this happened, I wash my dishcloths made with the same blocks and the same yarn all the time, with no problems.  Maybe it's because usually there are one or two dishcloths in a whole load of other wash instead of just the afghan with all yarn to rub?  Anyway, the result is that when you look at it close it now looks like an afghan that's decades old and been washed and washed and washed.  It'll still be snuggly, but I'm really hacked. 


Bonus, it was the project that had been on my UFO list the longest, so I'm super glad it's finished.


Friday, January 9, 2015

New Mandala is Finished!

My new mandala is finished you guys!  Its official name is "Ring around the Ranch" in honor of both the previous one (Ring around the Mole) and Josal Ranch, owned by the wonderful couple who commissioned the project.  I'm so excited to have finished it and delivered it to the clients.  They love it, so I consider it a job well done.  I finished it right after Christmas so it's a 2014 finish, but completing it feels like a great way to start 2015.  I've blogged about it a bunch, so there are tons of in progress pictures if you want to click back through them.

One feature I really like is the secondary patterns in the quilting.  You can see them a little bit in the overall picture, but also in some of the detail shots.  Th large nine-pointed star and nonagon in the center (around the robins), and the large arcs that frame each corner.

Ring Around the Ranch, 2014, 57" x 57" c. Shannon Conley


Here are a few detailed shots of the large corner birds.  I had a good time with these birds.  They're one of my favorite parts of the piece.  I think I like the crested caracara (bottom turquoise one) best, but the owls are a close second.    For those of you that remember the wretched holes, I patched them with the bo-nash powder and quilted over them and you really can't see them at all.  They're right above and below the beak on the left heron.

As before all the animals have beaded eye or face details.  On some of the larger animals it's more than one bead (to give some shape) although they're quite hard to see in the photos.  My mom said the stray green threads kept catching her eye but when she'd reach up to pluck them off, she'd realize they were catfish whiskers....


Blue Heron Detail, Ring Around the Ranch, 2014, 57" x 57" c. Shannon Conley

Red-tailed hawk detail, Ring Around the Ranch, 2014, 57" x 57" c. Shannon Conley


Crested Caracara detail, Ring Around the Ranch, 2014, 57" x 57" c. Shannon Conley

Great Horned Owl detail, Ring Around the Ranch, 2014, 57" x 57" c. Shannon Conley

Here are a few shots of the areas with most of the overlays.

Detail, Ring Around the Ranch, 2014, 57" x 57" c. Shannon Conley

Detail, Ring Around the Ranch, 2014, 57" x 57" c. Shannon Conley


Detail, Ring Around the Ranch, 2014, 57" x 57" c. Shannon Conley


 And finally, a couple of pictures of the center.  The logo in the middle is their ranch sign/brand.

Detail, Ring Around the Ranch, 2014, 57" x 57" c. Shannon Conley

Detail, Ring Around the Ranch, 2014, 57" x 57" c. Shannon Conley


And here's a picture they sent me of the quilt hanging in their home.  I love the way it looks on the rock wall, and the warm colors in those two brown birds go very well with the bench!
 
Ring Around the Ranch, 2014, 57" x 57" c. Shannon Conley


Many thanks to the Kanetzky's for supporting my work.  Now it's off to the 2015 projects!  I'm linking up with the fabulous Nina-Marie as always!


Wednesday, January 7, 2015

Christmas Ornament For Mike

Happy 2015 everyone!  I hope the new year starts out with hope for all of you.  I don't really do too well with resolutions (although does it count if I had grapefruit for lunch?), but I think my goal in 2015 is going to be being more active.  Not active as in busy, I'm always plenty busy, but active as opposed to passive in the face of life challenges.

We were privileged to have a wonderful break over the holidays at my parent's house and luckily my sister and her family were able to be there at the same time as we were so we got to see and hang out with the fabulous kiddos.  Anna and Alex get more fun every time I see them.  My mom and I also had a day to try out some new-to-us techniques which I'll be sharing in the next week or so.  First though follow-up with a few more after Christmas posts.

Last week I shared the ornaments I made for the kids and for some friends of mine, but I knew the Swedish stars weren't quite Mike's thing.  When my bloggy friend Lee Anna over at Not Afraid of Color shared her fabulous snow globe ornaments I knew I had to try them out.  I made this one for Mike, the center is his motorcycle (it's a machine embroidery) and I covered it with white tulle and quilted snowflakes.  He's not really into ornaments (though he is into motorcycles) but I think it turned out really cute!  It was pretty fun actually, and I think I might make some more for everybody next year.


Monday, January 5, 2015

Christmas Presents for the Kids

As always there were a few handmade Christmas presents for the kids in addition to their ornaments.  First up was another teddy bear from Amigurumi Two.  This time I made the bunny and I think she turned our really sweet.  The Koala was a big hit at Alex's birthday so my sister requested another one (so they wouldn't take it from each other).  I love being able to use stash yarn, and the bunny is just as soft as the koala was.  She was well-liked by the kids on Christmas, and surprisingly by the Bentley-dog who I found cuddling with the bunny several different times.


I also recently inherited a giant bag (garbage bag-sized) of lace trim.  There was more in there than I could ever use in a million years, so I thought I'd make a fun skirt for Anna's dress up chest.  It's pretty long for her now, but with any luck she'll be able to play with it for a long time.  I hope she likes it- it seems like the kind of thing that would go well for dress up.  I, for one, imagine using it as a headpiece as well, but maybe I was the only small child who liked to turn dress up clothes into elaborate veils and hats....  I was inspired by all the no-sew tutu tutorials, but I didn't want all the bulk of knots around the waist, so I just folded each piece of lace in half and sewed a little pocked on the top and then threaded it on the elastic.  I did knot a couple of short curly pieces on top after threading all the rest just to give texture.  I feel like I hardly made a dent in the lace selection (I estimate having used ~50 yards for the skirt) so there's plenty left for other projects.  Thanks so much to my mom's friend Willa who gave it all to me.  It turned out to be a bit too big for Anna just yet, but Alex loved wearing it over his head- he looked like a Norseman draped in furs or something!


Finally I made Alex a "who loves Alex" book just like the one I made Anna before.  Evidently I didn't blog about it.  Anyway, it's a photo book with big pictures of Alex on each page with all the people who love him.  That is,  "This is Grandmother.  Grandmother loves Alex!" and so on.  The printouts are just regular printer paper in sheet protectors, intended to be swapped out easily if handled too roughly.  Becky said Anna really enjoyed looking at hers, so I decided to make one for Alex too.