Friday, October 26, 2012

Blogger's Quilt Festival: Seymour the Coelophysis

The always awesome Bloggers Quilt Festival is here again!  Head on over to Amy's and check out all the wonderfulness.

Amy's Creative Side


Update: My BQF entry number is 175

This time I want to share with you a fun quilt which I recently finished featuring the dinosaur Coelophysis.  Coelophysis is the state dinosaur/fossil of New Mexico, thanks to discovery of a large bed of Coelophysis skeletons at Ghost Ranch, near Abiquiu, NM.    The quilt is called "S is For… #3: You Cleared My Name".  It's the third in a series of quilts incorporating the serpentine S shape (created in this case by the dinosaur neck and tail).  For a long time, Coelophysis was thought to be cannibalistic, but recent scholarship has shown that he did not eat his own young, and thus his name has been cleared!

The design is original.  My main concept was to have Seymour's skeleton depicted on a background of his current home while the reverse side of the quilt would depict Seymour's body in a more triassic setting.  The background on the front of the quilt is Chimney Rock, a New Mexico landmark.  The quilt is raw edge applique and is made with a variety of types of commercially available fabrics.  It is embellished with twine, trim, wool roving, beads, dryer sheets, polymer clay, foil, and paint sticks.  

The quilt is actually constructed as two completely separate pieces, each quilted and bound.  The two pieces are designed be laced together (via trim incorporated in the edging) enabling display as a two-sided back-to-front work, or unlaced and displayed side-by-side as a diptych (as shown below).  Each side is a mirror image of the other so that when the two pieces are displayed back-to-back the bones sticking out on the front side (for example in the tail) line up with the body parts (for example the tail) sticking out on the back side.  I quilted it on my old Singer 201.  It was a challenging project as I pretty much made it up as I went along!  I hope you enjoy seeing my dear Seymour (that's what Kenda named him) because I certainly enjoyed making him.  For more posts about him, click here.


S is for...#3: You cleared my name.  Displayed side-by-side, left panel is the front while the right panel is the back when displayed for two-sided hanging.


Quilting Details


 Detail of the bones and body where they stick off the edge of the quilt (taken during construction)


Detail of foreground elements


And one more, sorry, but I love the teeth!  I made them out of polymer clay and sewed them to the quilt at the very end.


Blogger's Quilt Festival Stats:


Title: S is For… #3: You Cleared My Name

Size: Each panel, 24” x 70”, 2012

Special techniques: raw edge applique, beading, handmade teeth composed of polymer clay, surface embellishment with dyed dryer sheets, wool roving etc.  Trim incorporated into faced binding to enable lacing of one side to the other.

Made and Quilted: Shannon Conley

BQF Categories: Art Quilt, Wall Hanging, Home Machine Quilted.

Super thanks to Amy for hosting such a great event!

I'm also linking up at the Off the Wall Friday Art Quilt Linky over at Nina-Marie's!


Here's the label, sorry for the out-of-focus picture!


This is the label text:
Coelophysis bauri, a carnivorous theropod dinosaur, is the state fossil of New Mexico due primarily to discovery of a large number of skeletons near Ghost Ranch, NM.  Coelophysis had long been the poster child for dinosaur cannibalism until work published by Nesbitt et al. in Biology Letters (2006) demonstrated clearly that stomach contents from mature Coelophysis were not juveniles of the same species or even dinosaurs at all, but rather were unrelated early crocodylomorph archosaurs.  In honor of Coelophysis’ “cleared name” I created this original art quilt depicting him, at approxmately full size. He is shown in his modern-day home (in front of Chimney Rock) on one side and in a more Triassic setting on the other side.  The quilt is made of commercially available fabrics of all types and embellished with twine, trim, wool roving, beads, dryer sheets, polymer clay, and paint sticks.

Hexie Pouches

I wanted to make a little pouch to send along as an extra to my swap partner in the hoop-la-la swap going on now (hosted by Sew Allegorical).  I had a bunch zippers in a variety of colors hanging around, and these hexie flowers have been pinned to my design wall for ages waiting for a home.  I decided to go ahead and make a bunch of pouches while I was at it.  They're in the neighborhood of 9" square and have contrasting bottoms for fun.  I'll send one to my partner and add the rest to my charity pile.  My favorite is that bottom one on the right with the moo fabric.  It's lined in this super fun pink fabric with white polka dots!


Wednesday, October 24, 2012

WIP Wednesday: No more little pieces

Hey everybody!  Hope the middle of the week is treating you right.  I've been going nuts at work lately so just a quick update today.  My big finish this week was my green and yellow silk screened quilt, if you didn't see it Monday, definitely check it out.  I'm so excited to have it done.  

Other finishes this week

Other finishes this week include a small secret Christmas project, some pouches I'll post about later this week, and this fun tote bag I sewed up last night.  I wanted something sturdy so I could carry my laptop/lunch/miscellaneous stuff back and forth to work.  The other day I was going through my not-quilting-fabric boxes and I found a big piece of this delightful green and purple home-dec weight fabric.  I have absolutely no idea where it came from, but I just love it!  The colors go really well with the green/yellow quilt I just finished too!  It's a really basic totebag, no pockets/zips/closures or anything.  It does have multiple layers of fabric and interfacing though so that it feels pretty substantial and stands up pretty well.


Progress this week

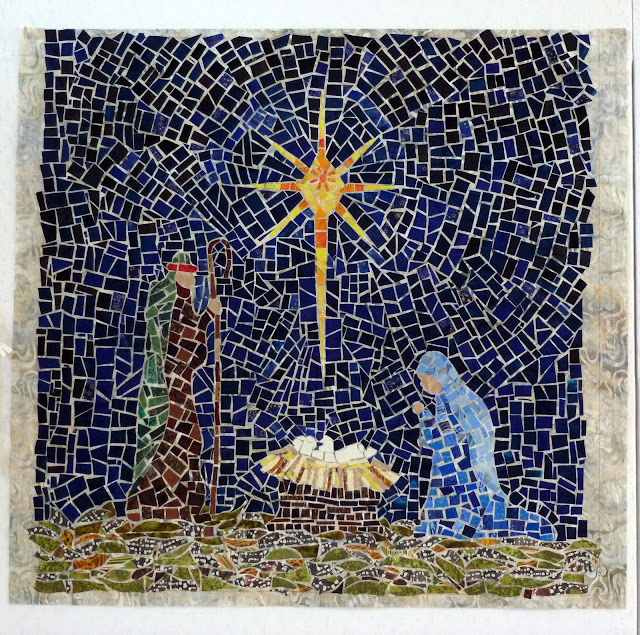
I made quite a bit of progress on the Nativity quilt- I got all the little pieces cut and fused.  You can see the whole thing below.  Now I just have to layer and quilt it!


No Progress On

Everything else.  The not-done list is getting pretty overwhelming, but it was so exciting to finish the silk screen quilt that I'm trying not to let the UFOs get to me!  Hope you're all having fun!

Monday, October 22, 2012

Spring in October!

A few weeks ago I mentioned that I was working on quilting my silk screening test medallion.  I'm so excited that I actually finished it this weekend!  I was going to post some in progress photos last week, but never got around to it.  

Here's the medallion just after I silk screened it.  My mom and I made our own screens- for more on that process, see this post.  I also tried painting/overdying/silk screening a commercial print fabric- that's the second picture with the family of quail.  That piece is still in my waiting-for-a-plan drawer, but the first one is done!


Aside from the borders, it's mostly a whole cloth, just quilted with different colors of thread, mostly plum, green, neon yellow, and silver metallic.  I put a row of piping between the main panel and the borders; I'll never do that again- what a mess to quilt up to.  Every time I got close to it my foot got caught resulting in a wretched ugly spot in the quilting.  The inner purple quilted frame is adapted from a dover book of copyright free art deco style borders.  I love the organic framing effect it gives.  Unfortunately, the colors in the silk screen faded quite a bit after washing the quilt to remove the quilting marks- I guess I needed to iron more to set the fabric.  I'd not originally ironed it because I didn't want to set the lines I'd used to align the screen designs (see blue lines in first picture), but I think I probably should have to prevent fading.  I love the way it turned out, so soft and springy!  Now to find someplace to hang it.


Spring in October, 40" x 40" c. Shannon Conley, 2012


Feels really good to have another big (for me) finished project!


Friday, October 12, 2012

National Parks

I don't really have a bucket list, but one of my life goals is to visit all of the National Parks in the US.  We visited a bunch of them as a kid, and as an adult I've traveled to many more with friends, family and Mike.  I have the fun National Park Passport book to track the parks you visit, but the other day when I saw this National Park Checklist print on etsy, I fell in love with it too!

Sweet Mike ordered it for me as a present and when it came I couldn't wait to get it hung up.  It comes with little tree stickers you put on when you've visited each park; they're very cute.  It's 11 x 17 which is a standard size paper, but apparently not a standard size frame.  When I checked at hobby lobby, just the frame itself (no glass, backing, or framing) was going to cost over $50.  Eek!  I decided I'd try my hand a making a frame-like-thing, so I bought this piece of pretty trim from Home Depot for $16 and went to town.

Mike actually cut it out for me using a miter box and I just assembled the four sides using wood glue and a staple gun.  I decided to piece a fabric background on which to float the print (kind of like a mat, and decided to just sew down the print itself rather than trying to deal with glue and the potential for it to fall off or peel at the corners.  Such a fun alternative to traditional framing!


After finishing it, I put on the tree stickers for the parks I've visited; they're the colors of the words "national parks" at the top of my print, so look fun and bright on the print.  In spite of my best efforts, I've only been to about a third of them.  I see lots of camping trips in our future!

Tuesday, October 9, 2012

The Nativity Quilt

It occurred to me over Christmas break 2010 at my parents that I didn't have any sort of Christmas quilt.  Weird in light of the fact that I have several Halloween/fall minis and my mom has about a billion Christmas quilts.  Clearly the only possible course of action was to START-ANOTHER-PROJECT-IMMEDIATELY.  Which I did.  Of course, at that time I had several other ongoing projects, but when has that ever prevented any of us from starting something new?

I decided to do a mosaic quilt depicting a nativity, an idea that was inspired by an article about abstract mosaic quilts in a magazine that came out about that time, I think it was a Quilting Arts or Quilters Newsletter or maybe American Quilter.  I know, very helpful.  In any case, I made my pattern and added fusible to a bunch of fabric and then assembled/fused Mary and Joseph.  It was then time to go back home after the break and the quilt has remained packed away ever since then.  It came out once, but only because I was changing how I stored my UFOs.  The quilt has appeared on pretty much all my works-in-progress lists (including this one which was the first I ever posted).  After last Christmas came and went without any progress on it, I promised myself I'd work on it this July no matter what.  Of course in July I was busy finishing Seymour, so that didn't happen.

Last week though, I got it out!  Hooray!  Ever since then I've been working on it.  My background fabric (which shows through as "grout") is a pale swirly grey, and the medium tones of Mary and Joseph stood out nicely against it.  This past week though, as I was piecing on the baby Jesus and the star (in lighter yellows/oranges/browns) I thought there might not be enough contrast.  You can see it here in that stage (never mind the torn freezer paper pattern I had only halfway removed).


My next step though was to fill in the background with lots of blues, dark blues, darker blues, and blacks (to feel like a starry night).  As soon as I started, I realized that it was all going to be ok.  The baby Jesus and the star stand out great against the dark night.  Mary and Joseph actually blend in to the background a bit more than I'd like especially Joseph, but I'm going to try to compensate a bit for that during the quilting, and I really love the way your eye is instantly drawn to the star and downward to the baby.


I'm still working on filling in the background, it doesn't look that big until you've spent hours and hours and millions of pins cutting and pinning each tiny tile piece up there.  It's certainly taken a lot longer than I thought; I figured I'd knock the background out super quick (based on how the people sections went), but of course I didn't really consider how much bigger the background section is.

My goal is to have this finished by Thanksgiving so it can go on the wall when I get out the Christmas decorations this year.  Wish me luck as there are bunches of other things also on my list!!

Finishes This Week
One tiny secret project and one other small secret project (Christmas Presents).  No fun, I know.

Other Progress This Week
-I'm still quilting on my silk screened leaf quilt, maybe I'll have an update on that Friday.
-My singer 201 broke during said quilting (does that count as progress?  I don't think so).
-I started designing my project for the Hoop-La-La swap over at Sew Allegorical.

No Progress
-Too many to even list!

Linking up with Lee as always and hoping you guys are having good work-in-progress!

Monday, October 8, 2012

Pillowcases

A little while back the fabulous Kenda mentioned that she'd reworked a reversible dinosaur pillowcase into two pillowcases for her little men.  It occurred to me that making some pillowcases might be a good thing to do with some of my favorite focus fabrics.  I like the idea of getting to see them every night.  Last year at Christmas my mom and I made some flannel pillowcases using the hot dog method which was pretty simple. I decided to make three for me and five more to donate to the women and children's shelter in Ruidoso.  I used the tutorial over at Sew Hooked.  It was a super easy and fun project which really shows off the fabrics.

I love all of them, but my favorite is the one with the purple cuff and the bright circle fabric.


Friday, October 5, 2012

Felt Thingy and Something Much Nicer

One of my favorite design blogs is How About Orange.  Jessica has a great variety of content and a wonderful eye for form and color.  About a million years ago I pinned this cute project she blogged about intending to make it.  Then several months ago, I finally got around to doing it.

Right from the start though, I was a bit doomed.  In the first place, instead of using lovely soothing high quality felt, I just decided I'd use what I had which is that weird polyestery-feeling cheapo craft felt.  Don't get me wrong, it's useful for tons of things, but not when you're going for a lush wooly feeling.

My next error was deciding that instead of using one color (like she did) to make the pattern stand out, I'd use ALL THE COLORS.  Very bright neony ones too.  Then, instead of just trying a few squares to see if I liked the way it went together, I cut up about seventy five little squares of felt. Just jumped in with both feet; cliched, I know.  When I finally started assembling the squares I realized that my cuts weren't perfect.  They were ok, but in order for the whole thing to assemble nicely, the cuts need to be exactly right and the materials high quality.  I assembled some of it, but it was rumpled, felt icky, and looked like skittle vomit (sorry).

Alas; I was so frustrated by my lack of success that I shoved it, and all the extra pieces, back into my felt/embroidery bin, there to remain ignored and forgotten until the studio cleanup last night.  Then, in the interest of crossing things off my list, I decided I would either throw it away (thanks Leah for encouraging us to have the strength to do this when necessary) or "finish" it.  I looked at it for a while and was strongly leaning towards tossing it in the "tiny fabric scraps to use for stuffing things bin" when I flipped it over and realized the errors weren't so obvious from the back and the pattern was more soothing since there were fewer corners.  Of course due to the imperfect cuts, it didn't really hold together terribly well and there were all these floppy corners so I just "quilted" over the whole thing in a grid.

So here is the finished front:  terrible, no?  It looks like something I might have made in the third grade (with my apologies to the third graders out there).  Definitely a far cry from this.


But here's the back.  Not so bad I think.  I'm going to use it as a mug rug next to my hand sewing chair.  I think it will actually look cute sitting on my happy pink side table.


Finally, some redeeming beautiful art;  I was lucky enough to be the winner of Nina Lise Moen's generous giveaway.  She sent me two of her beautiful art quilts- they're each about 8 x 10 ish and perfectly designed to hang as a diptych.  I find them to be very soothing, and I love looking closely at them to see all the wonderful different fibers and surface design techniques she incorporated.  Just feast your eyes!


Thanks again Nina Lise!

Monday, October 1, 2012

Cathedral Window Pincushion

The cathedral window pattern has been around for a long time, but I've never had the desire to make a whole cathedral window quilt, although there are some beautiful ones out there.  Recently (for me, which actually means six to eight months ago), I noticed bunches of cathedral window pincushions crop up everywhere and decided that making one would be a good way to satisfy my craving to try the pattern.

Even though I'm trying not to start new projects, I thought doing a little quick-and-done project after having made the entry deadline for Seymour would be just the thing (of course I'm miles behind blogging about it).  I used the Moda Bake Shop Tutorial and made up four of these babies.  Not sure what I'll do with them all, but I'll definitely keep one of them.  I didn't intend for them to be Christmassy, but a bunch of Christmas scraps just jumped out of the bin and begged to be used, so two of them have a wintery sort of feel.