Thursday, November 29, 2012

Jolly Ranchers: A value exercise

Over at the fabulous Stitched in Color, Rachel has been leading a value added quilt along challenging us to incorporate and consider value as a critical design element in quilts.  I've certainly found that in quilts where I make an effort to include a wide range of values, the outcome is definitely more striking.  As soon as I saw this series of posts,  I thought of a quilt my mom made several years ago, and thought I'd share it!

Value Added


My mom and I designed this quilt and she made it a few years ago when we were baby beginner quilters.  I think it was probably the second quilt she made.  It lives now on the guest bed in my sister's old room so I was lucky enough to get to sleep under it when I was just there for thanksgiving.

When I first drafted the block for this we thought it was original, but quickly realized otherwise, I think it's just what you'd call a wonky log cabin block.  What I think really makes this quilt special is how the color selection makes the block disappear giving a great sense of motion.

One of the things I've always thought contributed significantly to the design, specifically to the sense of depth and motion is the range of values in the pinks and greens.  I think the dark light transition of the green and purple adds a lot of visual interest to the design.  Mom named the quilt Jolly Ranchers since the intense colors reminded her of the grape and apple candies.

Jolly Ranchers, c. Vicki Conley, 2007, 78" x 90"

back

Hope you enjoy this quilt, I really love it and am so glad she kept it!

I'm going to go ahead and link up with the value added flickr group and QAL linky; Rachel said it was okay even thought it wasn't a new quilt since I haven't shared before.  

Many thanks to her and her co-hosts for their fun posts!


Monday, November 26, 2012

Christmas is Coming and the Nativity is Finished!

I hope everyone had a glorious and grateful Thanksgiving!  We had a lovely celebration in New Mexico with my family and arrived home (with NM Christmas Tree) yesterday evening.  I set up the tree without decorations, and so far the puppy hasn't really been too interested, but Bentley's tail is so dangerous I think we will really not be able to have any ornaments on the bottom branches.

Anyhow, I wanted to share pictures today of the finished Nativity quilt, called "Rejoice, Rejoice".  I finished the quilting before we left and stitched down the binding (it's a muted gold silky ravely stuff) in the car.  I blocked it while we were in New Mexico and my dad took some pictures of it for me.  It was difficult at first, the flashes he uses to take quilt pictures caused weird reflections off the tulle that made it look like the whole quilt was covered in dandruff, but after trying a different light source he got some great shots.  I'm so excited this is finished and looking forward to hanging it up tonight when we get out the Christmas decorations!

For more posts on this quilt, see here and here and here and here

Rejoice Rejoice, Mosaic Nativity Quilt, c. Shannon Conley, 2012, 39" x 39", Photo Doug Conley


Rejoice Rejoice, detail.  Shannon Conley, 2012, Photo Doug Conley

Rejoice Rejoice, detail.  Shannon Conley, 2012, Photo Doug Conley

Rejoice Rejoice, detail.  Shannon Conley, 2012, Photo Doug Conley

I'm going to post this on the 2012 Christmas Quilt Show, you guys should go check it out, there are some lovely quilts!


Linking up with


Fresh Poppy Design
Creations by Nina-Marie


Wednesday, November 21, 2012

Weekender bag is finished!

As a quick update, today's post is all about my big finish for the week, my Amy Butler bag, but I've also been making good progress on my nativity quilt so yay!

For a long while I've been wanting to make an Amy Butler Weekender bag, and actually had my LQS order the pattern for me over a year ago.  As I mentioned last week, I finally got started working on it.  It seems like one of the most popular and most challenging bag projects in blogland, so I've been slowly reading  up on everyone else's experiences with the bag.  I found so many fabulous hints looking at all the beautiful bags made by these ladies, I thought I'd gather up some of the tips in one place.  I've summarized them all below the pictures, if any of you are interested in making a weekender, I think it's probably worth a read.

So my overall opinion: interestingly, due to the profusion of talk in the blog world about how challenging this project is, I was actually prepared for something much worse.  Don't get me wrong, it took forever and was definitely the hardest bag I've ever assembled, but I'm not a particularly good bag maker and it really wasn't as hard as I thought it would be.  Basically what I'm saying is, if you're interested in trying it, don't talk yourself out of it!  The results are worth it (but read over all your tip sources first and make your handles a bit longer!).

So while the above sentences are completely true, and I totally encourage you guys to make this bag,  I feel it incumbent upon me to say that I wrote that after doing one half of the dreaded step 11C (main bag assembly).  However, last night I was sewing on the other half (these are really the only two hard steps) and you guys, it was terrible! I sewed over my very own fingers.  TWICE!!  I did not think this was actually possible, but when pushing/pulling a giant thick bag through a sewing machine with a zipper foot on which does not have much front (for the cording), it is very very possible.  And, incidentally, when my fabulous new Horizon 7700 encounters something it cannot stitch through, does it recoil back like an elevator door?  No it does not.  It just bangs away (lovely grinding motor noise), trying its best to penetrate whatever is underneath it.  Eventually, on the thick part of my fat middle finger it encountered something impenetrable (oh I don't know, the bone, or maybe some thick muscle) and broke the needle.  The 100/16 jeans needle!  The second time, on my index finger, it just ground away until the needle came out the other side.  Sorry for all the histrionics, but there isn't much more startling than seeing your sewing machine needle going into your finger one one side and out on the other.  Obviously as large catastrophes go, this wasn't one, but it was fairly traumatic and my fingers are still throbbing this morning, so when you make this bag, be careful!

Anyway,  here's my {awesome} finished bag.  In the tips section below you can read more details about changes I made, but mostly, I followed the pattern pretty closely except I added inside pockets and a shoulder strap.


Here you can see the internal pockets I added and the shoulder strap tab .


Tips from others.
In purple are the ones I tried, parentheses in black are my notes.

From Sew Allegorical

Use fusible hem tape for the piping  (this was by far the most popular hint, and I definitely did this).

Use #60 covered fabric buttons for feet. (not sure what #60 size means, but I am trying to make feet out of fabric buttons, but haven't done them yet).

New and Extra Needles (I definitely bought extra needles,  I used Jeans 100/16 as suggested in the pattern.  They seemed to work fine.)


Sew Crafty Jess

Use fusible hem tape for the piping

Make Handles longer   (Several people suggested this, sadly, I didn't notice until after I'd already made the handles. The handles are definitely too short for me to put the bag over my shoulder, but to compensate I made a shoulder strap)

Use clothespins to hold the corners together instead of binder clips  (at the dreaded step 11C I used a combination of pins and clothespins, but I think the key was that I hand basted the whole thing as suggested below.  This helped a ton!)

Use double ended zipper  (I did this, it was all I could find.  I was really excited to have double zips actually, so you can unzip from both sides.  I thought that would make it more like real luggage- interestingly though, the parka zippers like I and SewCraftyJess used are the opposite of regular zippers.  It took me a really long time of staring at it to get what was off, but I finally figured it out.  Basically, on a normal suitcase with two zippers, when the zipper pulls are right next to each other, the zipper is closed and they both slide outward to open the zipper.  But on the parka zipper, the closed zipper is with the pulls at opposite ends.  It makes no difference to the effectiveness, but it was just weird how long it took me to figure out why it felt just a bit off)

Inside zipper and flap pockets  (did this too, it worked fairly well)

Very important/complicated tip about sewing the lining  (I followed this tip and it was very helpful, it's basically a way to line up the lining so you can machine sew in at least part of it.  Check out her blog for a better explanation.)

Needle Book

Inner Pockets
Loops inside end pockets to attach a longer strap  (I did this, see above, seemed to work well!)


All Buttoned Up

Hand baste all the final pieces together instead of pinning  (hugely beneficial!  I definitely recommend this!)

Fusible Hem Tape for piping
Bottom panel a little long-(my pattern was new enough that this wasn't an issue)

Wise Craft

Bottom panel a bit long-check Amy Butler website updates for this. (again not an issue for me)

The Crafty Blackbird

Longer shoulder straps says ~3" extra?
Fusible Hem Tape

Fat Back end zipper foot.  Yuck!  (this was interesting, I looked long and hard for a zipper/piping foot without a fat back end but couldn't find one.  My zipper foot did ok, but one with a thin back end would have been better I think.)

Added internal zipper pocket with this tutorial  (Great tutorial for the inner zip pocket)

Binder clips around corners

Link to pattern updates!

1/8" clear plastic plexiglass in bottom (I just used template plastic, seems fine)

Recommends bag feet and shoulder strap

Hiuma

Lengthened Handles 1.5"
Added pockets
hand basted corners
fusible hem tape

Craftoholic

Good advice for how to pin before hand basting.

Mon Petit Lyons

Watch out for the recommended seam allowances!
Lovely removable shoulder straps with D rings.


Fabric Mutt

Finally, Fabric Mutt has the Long Weekend Sew Along Going on now, but I've never been able to figure out how blog hops really work.

Anyway, I love my bag and hope you'll try to make one if you like.  Let me know if you have any questions!'

Linking up with Lee at WIP Wednesday and Sew Much Ado.


Monday, November 19, 2012

Rainbows and Circles

I hope everyone had a good weekend.  I had a lovely one, I quilted a lot on my nativity and worked on the Amy Butler bag, but even better we got to do some productive domestic things.  We took all the dogs for a lovely walk in the park (Shooter is still not sure about the leash), and I gave the big three a bath.  When we go to my parent's house, Bullett insists on sleeping in their bed with them, so he always needs to have a bath before going.  
On Sunday afternoon one of the groups in the OU school of music was performing Monteverdi's Vespers (that link is not the OU group, but take a listen to see what it's like if you're unfamiliar), and the concert was just lovely.  Very fitting for autumn in my brain.  Excitingly, Mike hung the Christmas lights on Saturday; even though we won't turn them on until after Thanksgiving, the weather was nice Saturday so he thought he'd hang them up.  Super thanks to him for volunteering, because I hate that task.

I also recently received my swap package from the Hoop-La-La swap.  The wonderful Kelie from Craft Nurse Quilt sent me this great rainbow hoop with fun embroidered circles.  I think my favorite part is the embroidered script (Love to Quilt).  She changed colors every few letters and it's so me!  It looks great hanging with my other swap quilts in the studio.  Many many thanks Kelie!


I'm on track to finish the nativity enough to bind in the car on the way to New Mexico.  I'm not sure if I'll get any pictures up before I go, so if not, wishing you all a blessed and gracious Thanksgiving!

Friday, November 16, 2012

Quilting Fail

I thought I would take a moment to share with you guys my most recent series of quilting fails.  Womp Womp.  

 I consider myself an intermediate quilter and I really feel like I should be past some of these problems by now.  Alas, they are my own fault.  You may recall my gold angels quilted onto the Nativity quilt from last week? Well, I decided I should quilt some rings of echo quilting around them in blue to add some texture.  I started with a ring of radiating lines, and followed up with a ring of pebbles.  On the first angel I did the lines and pebbles, quilting along just fine, but was having real difficulty seeing where I was going, as the blue thread on blue fabric/tulle was pretty tough.

I thought it was going well until I flipped it over to the back.  Total quilting fail.  What a disaster,  it looked terrible!  All my pebbles were outside the lines and not touching, and my radiating lines stuck out everywhere and were weirdly spaced.  Even worse, I had a giant pucker in the backing (arrows) covered up with bunches of quilting.  It occurred to me that as the front was fairly stiff and not pucker prone, and that as my quilting showed up better from the back (so I could see where I was going), that maybe I should just quilt from the back.  Duh.  So I went back over the bad angel to try to fix the worst of the mess with the radiating lines.  What you see below is after I fixed it.  yick.


So then I went over to the other angel and painstakingly did the blue quilting all from the back.  Not perfect but definitely better.  So, score one for quilting from the back in this case.


And then I went back to the front.  Total quilting fail.  Do you know why?  Because after all that irritation and planning and ripping and trying to correct from the back, YOU CAN'T EVEN SEE THE QUILTING ON THE FRONT!!  When I take a picture from six inches away (the two top pictures), you can kind of tell which is the good one and which is the bad one.   From a foot away, (bottom pictures), you can kind of tell there's some quilting there around the angel, but your guess is as good as mine whether that's the "bad" angel or the "good" angel.  And from any farther away from that, you can't tell there's any quilting around the angel at all.  Talk about bad planning!  I could have just stippled the whole thing and you'd never know the difference.  No color contrast (which I knew there wouldn't be), but also no texture contrast (what I was going for), I think because the pattern of the tiles and the texture of the tulle just obscure it.


So not sure what the lesson here is, except plan better.  And, sadly I think, don't spray baste a quilt this big.  So how are you guys?   Any quilting fails out there in other corners of blogland lately?


Thursday, November 15, 2012

Giving Thanks for Super Fab Giveaways

I've recently been lucky enough to have been the winner of two super sweet giveaways, and just wanted to share them with you along with a big shout out THANKS to their sponsors.

First, I received the most lovely package from Stephanie over at Spontaneous Threads.  I won her October De-Stash giveaway and she sent a huge box stuffed completely full of fabulous Christmassy themed things.  I was soooo excited to receive it, and overwhelmed by how many goodies fit inside.  It had all kinds of things; fabric scraps and trims, but also Christmas decorations, soaps, all kinds of yummy home decor things, adorable book plates and on and on.  What a great package to receive, especially as I love decorating for the holidays.  I haven't put my Christmas stuff out yet, I'm a staunch not-till-after-Thanksgiving girl, but it's all waiting in the wings!


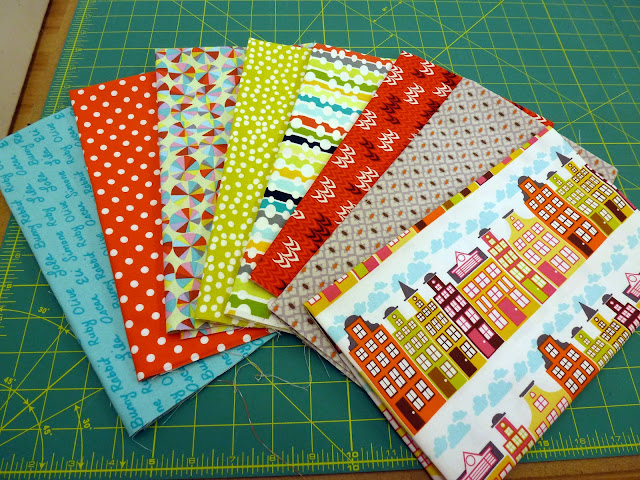
Second, I won the giveaway from Tactile Fabrics which Jeni was hosting over at In Color Order.  Jennifer at Tactile Fabrics sent me the yummiest fat quarter bundle-  I love the house print the best, but there are so many cute ones in here, the pie charts, and the chartreuse with polka dots, and the yummy one right next to the chartreuse with polka dots.  All fabulous!  I haven't bought new quilting fabric in a while (my crafty money has had to go to more boring things like zippers and needles) so it was so fun to get such a sunshiny package of new fabric in the mail.


Thanks again to Stephanie, Jennifer and Jeni!  You guys totally made my day (twice!).

Wednesday, November 14, 2012

WIP: Wednesday

I've been working on a variety of projects this past week with the net result that I don't have any finishes at all except for a tote bag I made with my sister of which I forgot to take pictures.  My biggest accomplishment was spending lots of time over the weekend with Becky and Anna, something I really wish I had more of!

Finishes:

Womp-womp (none)

Progress:

Late last week I spent a bit of time quilting along on my nativity quilt, although I haven't really made enough progress to show any more (lest everyone get tired of seeing the same thing over and over again).

Over the weekend I worked some more on the costumes for the Twelfth Night festival at church.  I have two completely sewn and finished now, and one finished that I just had to do some small alterations (actually just sewing about a million bells onto a jester costume).  I have one costume left to sew from scratch (an easy servant costume), and one more costume that requires alteration.  Sadly, the one requiring alteration will probably be more of a pain-in-the-neck than the one I make up from the beginning.  It's the king costume and it was commercially purchased but is too short.  Unfortunately because of the way it is constructed, lengthening it is not quite so simple as I'd like.

Here's the one I finished over the weekend- it's actually a really simple costume, princess seams, no sleeves, no zip.  I used up a bunch of gold fabric that used to be a curtain in my closet (the center panel) and got a bit more contrasting gold to finish it off.


I also finally (HOORAY) started actually working on my Amy Butler weekender bag over the weekend.  I bought fabric a long time ago for it but I wasn't really crazy about it, so this weekend Becky and I got some different fabric and I got all the pieces cut out and the handles made. I'm so excited to finally be moving forward with this project and I probably would never have started it now except that I needed a project that I could work on while hanging out with Becky and Anna.  Quilting requires too much concentration, but cutting out all the bag pieces was just the ticket!

I know it doesn't look like much, but it's progress!  The khaki with the big flowers is for the outside and the cream with swirls is for the lining and piping/handles/contrast.


I actually also started working on the memory quilt for my friend Linda, in as much as I got out all the blocks and organized them on my design wall.  I'm still missing a few from people so I have to gather them up before I can do much more on that front.

No Progress this week/UFOs/Projects I really need to get going on:

Dog Quilt
English Paper Piecing Mini
Thanksgiving Quilt (I'm probably going to try some quilt as you go on this.  Someday. right now it's a medium sized quilt sandwich waiting to be quilted)
Sun Printing/Cyanotype Blocks
Anna Butterfly Blocks
Silk Screened Quail
Bobbin Quilting
Dream Catcher Quilt, Fabric Challenge for MQS (we got the fabric for this at MQS last year)
Secret Christmas Projects
Boxy Bag (this has been on my wish list for a long time)
Sunglasses Case/Frame Purse
Snowflake Christmas table runner
Crewel Sampler  (I'm just craving this but have thus far resisted buying it).


Monday, November 12, 2012

Hoop-La-La Swap Sent

I meant to post this last week and didn't quite get around to it amid preparations for the arrival of my sister and baby Anna-Banana.  We had such a fun time, Anna is super-duper adorable. She is crawling all around and has so much fun playing with her rattles and chewing on things.  She has acquired a consonant (B) so we were excited about that too.

I recently participated in the Hoop-La-La swap being hosted by Sew Allegorical.  The swap was for a piece of hoop art involving piecing.  Since my partner (the lovely Jessica at Plum Patchwork) received the hoop I made for her, I thought I'd go ahead and share it here.  On the entry form you could specify whether you wanted a purely decorative hoop or a functional one (such as a clock or notions pocket hoop).  Jessica said either was fine so I jumped at the chance to try making a hoop clock, since I'd been wanting to attempt one for a while.  I figured a 12 point compass would be fitting for a clock and included some fun quilting around the edge.  It's hard to tell, but the outer hoop is wrapped in the same fabric as the stripes on the front.  I embroidered "time to sew!" on it since I figure we all need more of that!  I also included the pouch on the left below (which is actually more of a purple-blue rather than the bright blue the picture shows) and some yummy scraps as extras.  All in all a very fun swap and thanks so much to Sew Allegorical for hosting it!


Wednesday, November 7, 2012

WIP Wednesday, Angels All Around

It's been a bit stressful around here lately, but I'm trying to focus on the good things and get into a "gratefulness" frame of mind.  A couple of positives- we have adopted a delicious new puppy (she's the upside down one in the middle), my sister and baby Anna Banana are coming to visit this weekend, and Mike and I are going to New Mexico for Thanksgiving in just a few short weeks.


On the crafting front, I buckled down and layered the nativity quilt for quilting.  I used spray baste to baste it, and it's just barely small enough (40 x 40) that I think that will be ok.  Any bigger and I don't think there's any way I could keep it together.  I used a sulky temporary adhesive to attach the tulle to the quilt top (to cover up any loose corners), but I think I didn't use enough or something because it didn't stick very well.    Since there aren't any ditches to stitch in to stabilize, I started by stitching around the people in the nativity.  I also stitched around some major shapes that are not depicted in the mosaic but that will be overlaid in the quilting, namely two angels (in the sky) and a sheep (next to Joseph).  I'm now starting FMQing all of it- I began by filling in the angels with gold free-form feathers, and am slowly moving on with the rest of it.  I like it so far, it makes me happy that it is getting done, but there is a lot of quilting and it always feels a bit overwhelming to me at this stage.


And here's the angel from the back.


I'm starting to think seriously about the Christmas Crafting that needs doing, but so far haven't made any progress!!


Monday, November 5, 2012

Updates on Seymour

Two pieces of great news you guys!

Amy's Creative Side


First,  Seymour is a finalist in the Art Quilt category over at the Bloggers Quilt Festival.  Head to this link to vote for your favorites.  You don't have to have entered a quilt to vote, so definitely go check it out.  There are so many awesome quilts in the running; it's exciting to have been nominated!


Second, Seymour is being exhibited at a SAQA exhibit at the Open Space Visitor Center Gallery in Albuquerque, NM.  The exhibit opens this Saturday and runs through December 30th.  The Albuquerque Journal did a story on it, so click through if you're interested (sorry for having the two random survey questions to see the article).  I'm super excited as it's the first time my work has been in a gallery show.  Any of you that are in Albuquerque should try to stop by and see it if you can,  you can give Seymour a virtual hug from me.

This is the flyer for the show.  In other awesome news, the donkey quilt on the flyer is actually a quilt my mom made that's also in the show.  I love the expression on the donkeys' faces!


Tour of Honor Mini Quilt

Mike participated this year in the 2012 Tour of Honor Motorcycle Ride.  

From their website: "The event is a season-long, self-directed ride to memorials and monuments around the continental U.S. and Hawaii, with more than 35 states participating in 2013. Beginning April 1, visit as many sites as you want, with any route you choose."

There are hundreds of sites to visit, all over the country, but he made it to all seven in Oklahoma this year.  He asked me to make him something with the pictures he took for the project, so I made him this mini-quilt.  He wanted me to take his picture holding the quilt but said something about wanting to remain anonymous on the blog today because of his hat?  It didn't make much sense to me but I swirlied his face.


The sashing is all 3/4" and I practiced different fillers in each piece.  They're all the same fabric, not sure why all the blues look different.


One of the main things I realized is that I can't free motion quilt over the printed fabric sheets.  I use the June Tailor ones from Hobby Lobby, and I've done lots of projects with them before but I've never tried to FMQ.  In the past we've just quilted 1/4" inside the pictures (with a walking foot), but on some of the larger photo quilts I've made the pictures are really starting to sag so I wanted there to be more quilting.  I wasn't trying to do anything complicated, just a medium sized stipple, but my thread was breaking like mad and skipping stitches.  I tried switching needles, I tried switching from monofilament to the YLI 110wt silk thread, but nothing helped.  I thought initially it might be my sewing machine, but as soon as I switched to a practice sandwich the quilting was no problem.  I finally decided it was just the really stiff material.  It might have worked better with stronger/thicker thread, but I didn't want anything to obscure the pictures, so I switched back to my walking foot and just quilted a loose square spiral with the YLI silk in variegated light green.  That worked ok, but if I ever do another photo project where I know I need to FMQ I'm going to try a different approach.

I think Mike really liked it, he was very excited to hang it on the wall in the bedroom, although mostly I think because it got to replace S is For...#2 (or the vomiting dragon quilt as he calls it).  I moved the vomiting dragon into the studio; it's one of my favorites, but he really hates it, so this is better.  Hope you enjoy!


Thursday, November 1, 2012

Happy Halloween (ish)

I so wanted to post this yesterday but just got a bit behind. I hope you all had a fun and safe Halloween!   I dressed up for a party last weekend (as a knockout mouse), but didn't dress up yesterday.  I had choir practice at church last night so Mike stayed home and handed out candy (under duress).

I was in charge of the Cell Biology department pumpkin carving/decorating contest this year, so just wanted to share a few pictures from it (excuse the crappy phone photos)!  Here's my pumpkin


And here are some of the others.  There was an individual category, but also a lab category, and many of the labs had bunches of fun decorating their pumpkins yesterday morning with stuff from the lab.  Here are a few of the others!