Monday, May 20, 2013

Exciting news!

MQS was in Wichita this past weekend and I went up to see the show.  For those of you haven't been before, it's a show highlighting machine quilting, most (although by no means all) of the quilters who enter are professional longarmers.  The quilts are just outstanding, machine quilting (and piecing/appliqueing etc.) like you would not believe.  I'm always in total awe, and this year was no exception.

Anyway, they do have a small division called Just For Me for non-professionals who enter, and this year Seymour won best of show in that division!  The prize was a new Bernina 450 kindly donated by Midwest Sewing Center in Wichita.  I've never owned a Bernina before and I'm super excited.  Since it doesn't have a very large space under the arm, it won't replace my beloved Janome 7700, but I'm thinking about getting the embroidery unit for it and trying my hand at machine embroidery.

It was so cool to see Seymour hanging there on the row of "big winners".  He looks so small as all the other winning quilts were huge and gorgeous.  There were six big winning quilts, I couldn't get a picture with all of them at once.


I guess next year I have to move into the bottom of the professional division!  In other exciting news, Seymour is going to be part of one of the Special Exhibits at IQF Houston this fall, so keep a lookout for him if you're there.

Tuesday, May 14, 2013

SAQA Auction Donation Quilt

Last week I was in Seattle for the big annual conference for vision researchers (I'm so thrilled it wasn't in Fort Lauderdale again), and the week before that my mom and I went to the annual SAQA conference held in Santa Fe.  I have lots of rambly thoughts about that trip which are in an unfinished blog post somewhere.  I'm not sure if I'll post them here or not, but it was a great trip.

While there, I got talked into making a SAQA auction quilt.  Every year they auction off 12" x 12" art quilts to raise money for the organization.  I started with a piece of fabric left over from our sun printing project.  I shouldn't really say left over (thus implying I've completed all other associated projects), since I haven't yet done anything with the other sun printed blocks, but anyway....

This piece of fabric was actually red; my mom heard somewhere you could sunprint with setacolor (I think) so she painted it red and tried it out.  It didn't print very well, so I just mashed the piece of fabric around in our leftover sunprinting solution and layered a bunch of different negatives on top just to see what happened.

I'm sorry I didn't take a picture of the fabric before assembly, but it looked kind of cool with four layered jellyfish prints and an anemone print on a splotchy background.  I squared it up and pieced it into a spinning log cabin (anyone know the official name of that block?).  It's machine quilted and partially layered with three different kinds of tulle to give the impression of being underwater.


I love the jellyfish.  They're by far my favorite part.  I used several different colors and weights of thread and I think they turned out nicely.


Overall, not one of my favorite pieces but I hope it can raise a little bit of money for SAQA!

Linking up with Fabric Tuesday over at Quilt Story!

Monday, April 22, 2013

Star Miniature

I'm not sure why I'm calling this the star miniature except that "star project" is always how I think of it in my head.  I started it a long time back just as a hand EPP exercise for traveling.  I was content to just work on it in fits and spurts on airplanes for a while.  However, recently I've been dreaming about it (which is actually kind of weird for me), so in the last couple of weeks I've dedicated lots of hours to it.  I'm a pretty slow (and sadly inaccurate) piecer, but now that it's all put together I really like it!  It looks so much better without all the white basting thread that was holding in the papers.

The center part of the star is based on one of Hillbilly Tonya's Ahhhs which I drew out and then recolored.  It had been in this state for a while, but it felt too small and unfinished to be it's own thing and I didn't really want to make a bunch of them this size, so I designed and pieced an outer ring.


 Finally, just this week, I finished stitching it into the black background.  To this point it's all hand pieced and currently is about 20".  I'm going to cut down the black a bit though because I'm going to add a floating 1/4" piano key border (which I'll machine piece).  I want the whole thing to finish at 22-23" so that it can go in the miniature category at the shows.  It's like my very own rainbow color wheel!


I've also been working quite a bit this week on my orchard quilt (hooray), I got the sky tiles quilted and am working on the trees.  Hopefully a post about them on Friday.  Happy Wednesday everyone!  Linking up with Lee as ever.


Wednesday, April 17, 2013

Woof Woof- the dogs are out!

Happy Wednesday everyone!  I've been sewing lately, but not manically and not with much to show for it. Last weekend was filled almost entirely with non-sewing obligations, and the next three weekends I'll either be out-of-town or have guests visiting.

Bonus though, the guests this weekend are my sister Becky and the beloved not-quite-a-baby-anymore Anna Banana!  I'm so super excited to see them.  Becky thinks Anna is old enough to be introduced to (edible, non-toxic) play doh, so we're going to make some and see what happens.  Also, super exciting news, Anna's going to have a baby brother along in September, so boy sewing starts now!

Anyhow,  I want to share a bit this week about a project that I've finally pulled out of the wasteland of the WIP-drawers, my dog portrait quilt.  This is actually the only item left on my very first UFO-WIP list, from back in 2011.  Sadly, I haven't really done anything with it since then.  I mentioned back at the beginning of this year that finishing it was going to be one of my goals for this year.  I hadn't planned to start working on it until this summer but my mom sent me this call for entry and I thought I might try to finish it and enter.  

I started with three pictures of my (then) three dogs, Pumpkin, Bullett, and Missy and then edited them in photoshop.  Pumpkin has since passed away and we've acquired two new dogs, but I'm just doing these three for this project.

I printed them on fabric sheets we treated and ironed to freezer paper and then sewed them together, so each one is about the size of four 8.5 x 11 pieces of paper.  I put interfacing on the backs of all of them but evidently not strong enough because Bullett and Pumpkin both shrunk up when I started the thread painting.  I got so frustrated with that, I put them away (for a couple of years!).  I really love the edited pictures though so I'm just going to power through and finish them.  They'll all be assembled into one piece, probably with offset grey borders/sashing.

Bullett has been completely thread painted.  Pumpkin was two-thirds done when I put them aside; in the last week I've finished her left eye, ear, and the side of her face. My goal for the rest of this week is to finish her mouth and chest.
Pumpkin

Pumpkin, Detail


Since I'm thread painting really densely in one area but not others (the backgrounds) I don't think there's any way to completely avoid the shrinking.  However, to minimize it I've started hooping whatever section I want to work on, which has the added benefit of being easier to maneuver.  I've decided I'm going to get all three dogs done and then block them out as flat as I can, then layer for quilting before filling in the backgrounds.  I'm not optimistic about this since they're really wrinkly, but I'll hope for the best.

Anybody have any experience with this kind of thread painting?  I haven't started Missy yet, so any suggestions for a better approach would be greatly appreciated.  

I'm linking up with Lee over at WIP Wednesday and Nina-Marie over at the Off the Wall Friday.

Tuesday, April 16, 2013

Follow my blog with Bloglovin

The trees!

Morning everybody! Anyone out there going to the SAQA conference next weekend in Santa Fe?  I'm looking forward to it (yay), should be great.

I'm working on the arrangement of the trees in my orchard quilt and could use some input.  I have a total of seven trees, three were painted and cut out, three were thread painted on dissolvable stabilizer, and one was assembled out of fabric.  I'm not sold on using all of them necessarily, but I like the different textures the different types of trees bring (hard to see in these pictures).  So far they're all just set out on the background, but once I settle on an arrangement I'll quilt them down and add a bunch more small branches.  Take a look and tell me which placement you like best or if you have suggestions for other arrangements.  One of the challenges has been that in my original picture not all the trees are the same size; that is, there were baby trees and large trees.  But whenever I put the baby tree next to the large tree, it just looks like I've got the perspective wrong (i.e. that it's a farther away tree in the wrong spot) rather than like a baby tree.  

Number 1


 Number 2


 Number 3-4  (the same except with the baby tree added to the far right on #4)


 Number 5


 Number 6, 7, 8 (these are all similar except for the placement of the baby tree).


Any thoughts readers?

Friday, April 12, 2013

Hand printed Fabric Swap 3

Quick check in today, I hope everyone is finally having spring weather (still on the cusp here, lots of icy storms earlier in the week) and doing lots of crafty sewing and quilting.  I've been working sparingly this week so don't have much progress to show.  However, I did want to share the lovely hand printed fabric I received from my circle in the Handprinted Fabric Swap III.

My partners were Ginevra, Jessica, Chloe, and Suzanne, and just look at the lovelies they sent my way!  Don't worry they're all square, I just can't take a proper picture right now with everything else that's on my design wall.  I can't wait to figure out what to do with all these wonderful fabrics!


Friday, April 5, 2013

Sierra Blanca

While away at quilt camp I designed and assembled this quilt top featuring my home mountain Sierra Blanca. Fun fact for all those who imagine that the mountainy parts of New Mexico are all in the north or that southern New Mexico is all desert, or just never really thought much about New Mexico at all, Sierra Blanca Peak is 11,981 feet above sea level and the lovely surrounding towns are between 6,000-8,000 feet.  Makes for beautiful weather with fabulous hiking in the summer, skiing in the winter, and clear blue skies all year round.   Just don't go there right now- this time of year the wind blows 90 miles an hour kicking up super fun dust and allergens (just about like it does here in Oklahoma City).

Anyway, back to the quilt.  Usually I filler my quilts to death but at the urging of the instructor Gloria I decided to keep the quilting simple this time.  She suggested that by varying the thread/quilting weight, the spacing of quilting lines, and the thread color, one could use the quilting to enhance/preserve perspective in the landscape.  I attempted that here, and I think it worked fairly well.  It was really hard to resist going back and filling in, but I did.

On a side note, the quilting quality isn't great (in terms of stitch length, jerkiness etc.).  It had been about a month since I quilted anything and I'm amazed at how quickly my proficiency drops off without regular practice.  I especially noticed it on this quilt since the quilting was looser (and therefore much harder) than what I usually do.  Once again, I note to myself that I should practice on a sandwich every time I start something new.  Sigh.


Anyway,  things to note:  on the mountains, I started off in the foreground with bright green 40 wt thread and stitched the contours several times with far apart lines (I didn't have any 30 wt or 12 wt in the right colors or I probably would have tried it).  As I moved into the background, I used 40 wt thread with only one pass, 50 wt. thread, and then 100 wt thread.  In addition, I tried to make the lines closer together, and the thread colors less vibrant as the hills moved backwards.  In the sky, I tried to match the thread color to the fabric, using several different shades of blue and increasing the spacing as you go up.


As you see it now, I've finished the quilting and squared up the top, but haven't bound/faced it yet.  This is for three reasons.

1.  I can't decide if I should crop it-  I've contemplated cropping a couple inches off of the right side so that the peak isn't so centered, but I kind of like that right side and I haven't made up my mind yet.

2. I can't decide if it needs something else.  I'm not sure what the else would be, but all I know is that I like this but don't love it, and I'm not sure why.

3.  This quilt, the orchard quilt (in progress below) and the llama quilt (not yet started) were originally supposed to be all one piece with the orchard and llama inset into the mountain.  I decided against that, but as I work on the orchard (and look at the pictures of the llama in the snow), they still feel like they fit together in my brain.  All three have the same color scheme- dark greens and browns with blue skies and bright snow, and they feel thematically linked to my home, going from the close-up llama-from-the-backyard, to the orchard spreading out across the property, to the mountain in the near distance.  I can't decide if they should be somehow linked together into one piece (again, not sure how I'd approach that), or just hang as a grouping.  I may not decide on this until I have all three done, but I don't want to cut off any options.


For those of you who've made it to the end of the wordiness, I'd love your input on the three issues above.  I'm linking up with Nina-Marie's art quilt link party since she and her followers always have great suggestions!
Tuesday, April 2, 2013

April Goal Setting: Orchard Quilt

The dreaded March is over (I hope everyone had a glorious Easter), and I still feel bewildered and not-in-my-groove blog wise.  I've been doing quite a bit of quilting, but not as much writing about it.  Last week, I wrote a WIP: Wednesday post and forgot to link it up.  Over the weekend, I was going to write a follow-up post for my March "A Lovely Year of Finishes" and couldn't remember what my March goals had been.  When I went back to check on the blog I realized I'd never gotten around to setting goals for March (no wonder I couldn't remember what they were).  And then Monday morning, I remembered that it was the deadline for the artist contract and catalog photos for the Text Messages show, but couldn't find the contract anywhere.  After sending a panicked e-mail to the very nice curator about it, she re-sent the contract and I realized it had been attached to the original e-mail (which was still in my inbox) the whole time and that I was just an idiot.  So, definitely not-in-my-groove.

In an attempt to rectify this, I hereby set the following April goal for A Lovely Year of Finishes:

Finish the orchard quilt.

Over the last couple of weeks I finished quilting my Sierra Blanca mountain quilt (hopefully a post on that will be coming), and over the weekend started working on the orchard quilt as well as a warm sort-of-whole-cloth thing that I'll also share sometime soon.

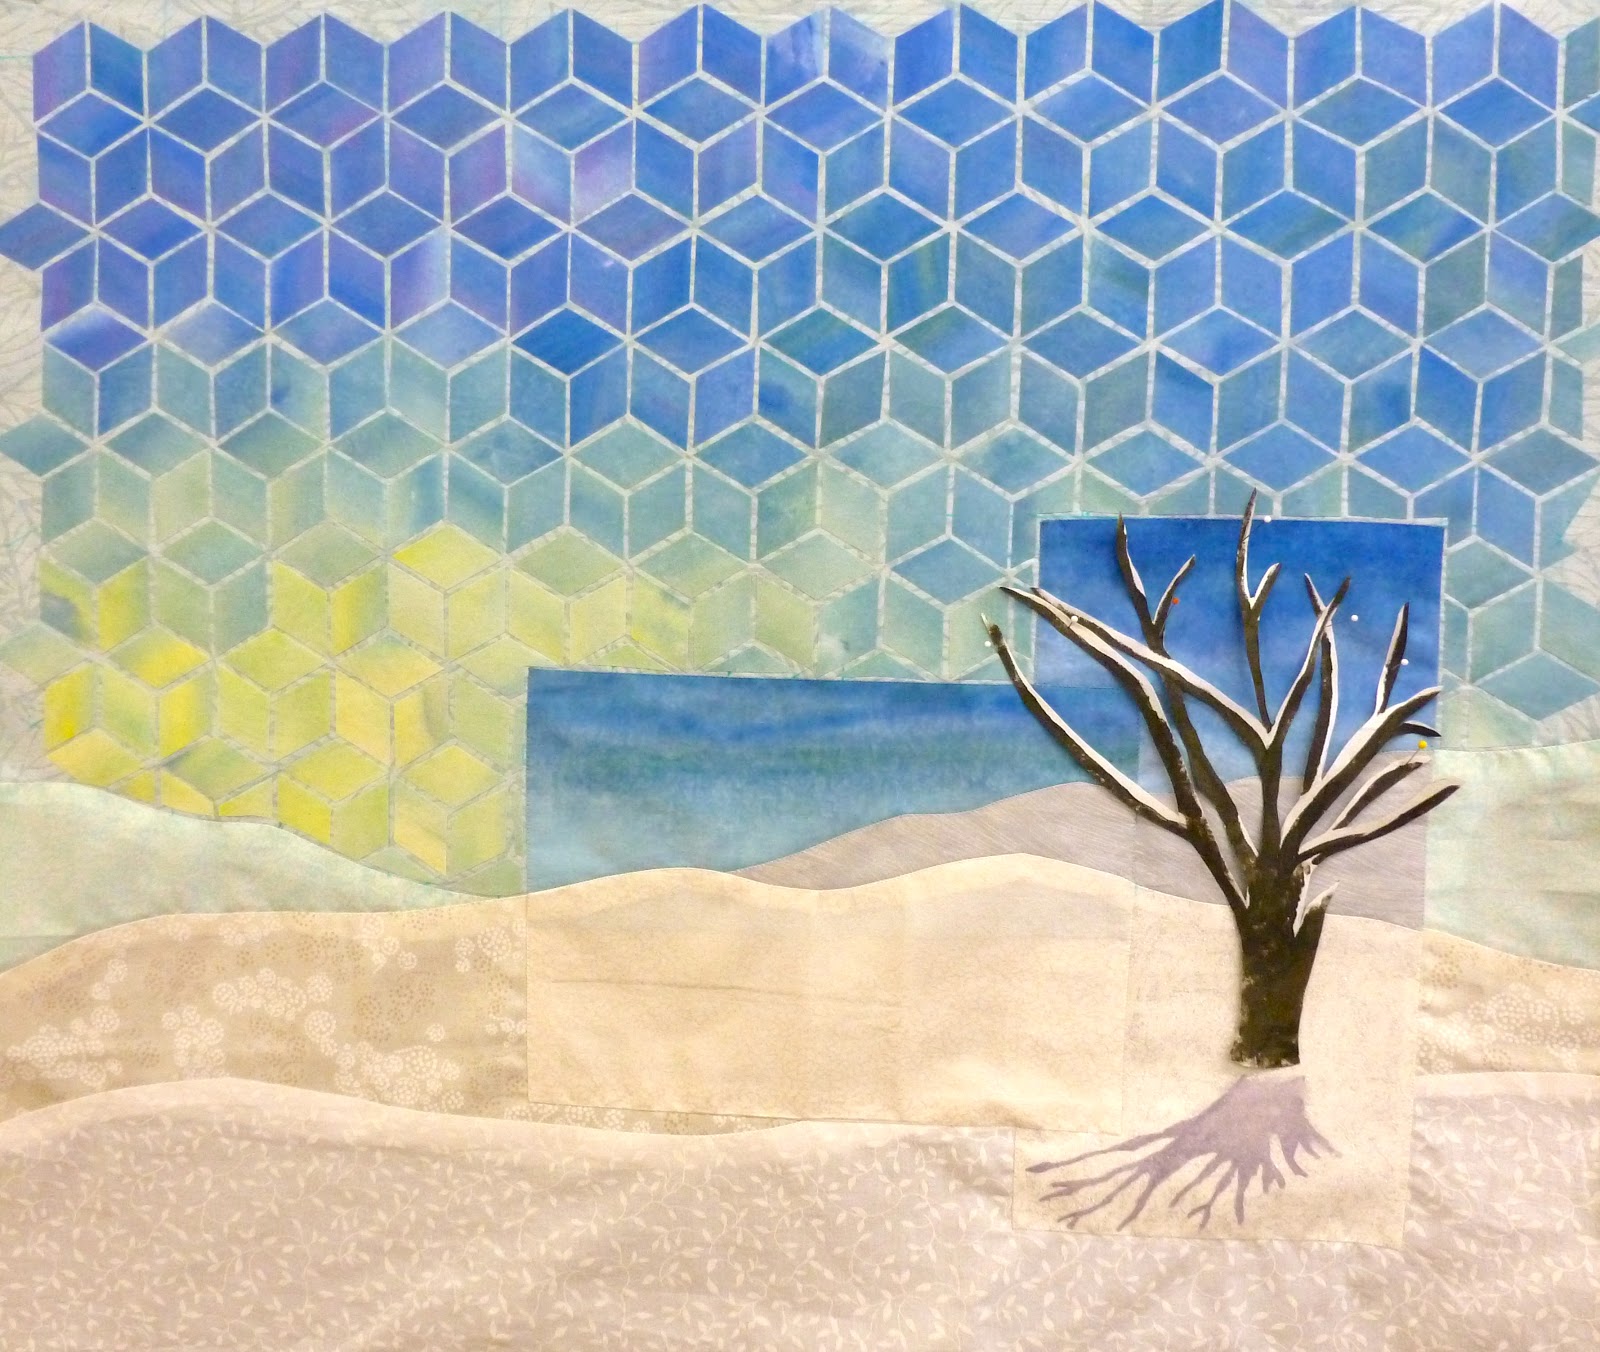
You may remember when last we saw it the orchard was just some disparate painted trees and background. After some consultation with my mom, I planned the composition and over the weekend pieced together the foreground.  I also tiled the background; this is a technique we learned in Gloria Loughman's class that I'd wanted to try.  The sky was cut up from the piece of fabric I painted in the class and I laid out the pieces in a tumbling block/star pattern.  For now they're just fused, but will be sewn down during quilting.


Up next, the trees!

I'm going to link up with Fiber of All Sorts of course, but also with the lovely Lee over at WIP: Wednesday (if I remember this time-sigh).  Happy quilting to all!

Monday, April 1, 2013

Covert Robin Swap Revisited

Last week I shared the things I made for my partner in the Covert Robin Swap, and today I wanted to show the lovely things that recently came in my mail.  My wonderful covert robin swap partner turned out to be Bonnie Ferguson of Fish Sticks Designs.  She has tons of adorable clothing patterns for your littles, I'm especially fond of the shortall/overall pattern and may have to get it to make for Anna.

Anyway, she sent me this lovely super large tote bag- it's simultaneously soft and sturdy and feels like the perfect size for the beach.  Alas, I don't get much to the beach, so I've decided to use it for my large upcoming crochet project.  I love the angled pocket detailing on the front, and the wonderful spring colors.

She made a wonderful little card pouch and key fob that clip inside it (I've wanted one of these key fobs forever and this one is already on my keys) and sent along some tasty extras.


Thanks Bonnie for being such a great partner!  P.S.  The chocolate was really really good.