In this one I wanted to focus on repetitive meditative prayer, and the idea of a spiral with a firm calm center. I chose the Gloria Patri as my text, and used the latin, "Gloria Patri, et Filio, et Spiritui Sancto, Sicut erat in principio, et nunc, et semper, et in saecula saeculorum. Amen." In my design it spirals out on both sides. I decided to screen print the text as I've had good luck with that in the past and I like the crisp edges it gives the letters.
One of the other things I wanted to try was designing my own ambigram for the center. I've been intrigued by these ever since first seeing them in the Dan Brown thriller Angels and Demons. I bought and stitched out the Arts/Crafts ambigram embroidery pattern from Urban Threads, but hadn't ever designed my own until now. I spent quite a while sketching, and when I liked my design, I scanned it into illustrator and did the rest of the text layout there. I use my silhouette cutter to cut my screens out of fusible vinyl and then mount it on organza. This was by far the biggest screen I've ever attempted, and unfortunately, it required five separate pieces of fusible vinyl to get all the letters. The biggest challenge with this was lining up the edges; in the past when I've done screens that required multiple pieces of vinyl, the text was in regular lines, so it was fairly easy to break the screen between each line. This time though since the text spiraled, it was impossible to make a rectangular screen (the shape of the cutting mat) that didn't have letters partially on each edge. Lining up the floppy vinyl screens was kind of a pain. Finally I got the screen all put together though.
 |
| Vinyl on organza silk screen. |
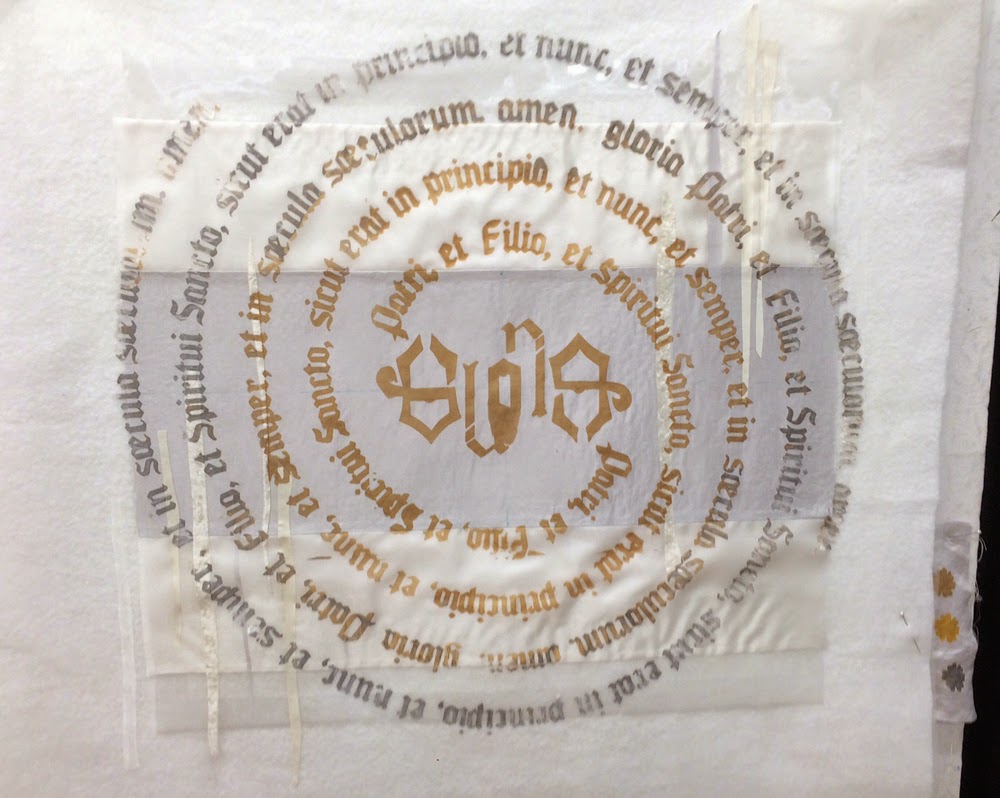
For my background, the original idea was to use various different types, colors, and textures of white. I even wanted some of the printing to go onto the batting. I therefore pieced this background (with minimal piecing since printing over seams is tough) and got ready to print. I also decided to use multiple colors- gold silver and white, with the writing getting lighter and more chaotic towards the edge.
Well, this was the first printing. What a disaster!
The paint smeared terribly under the screen, the seams were problematic and the colors looked terrible. I identified several specific problems, all of which were things I already should have known better about. First, it really is important to use screen printing ink or something with thickener. It doesn't take much runniness in the paint to prevent a good print (the gold paint I used on this try was fabric paint but not screen printing paint). Second, seams really are a problem if the goal is a super crisp print. Third, large screens (like my 36 x 36 one) are a no-no, especially without a frame. My screen didn't even lay flat because of how I'd had to squish the vinyl- so I should have known I wouldn't get a good print.
So I washed out the screen, picked a single piece of background fabric (a white polyester bengaline) and started cutting up the screen into several parts. I also switched back to the silk screen paint.
Print of the first section, much crisper:
Here's the second piece of screen taped down in mid-print:
And finally the last section of screen, taped down in mid-print:
The part with the ambigram is the central gloria. You can see what I mean in the next two pictures: they're taken from opposite sides of the table (but the print looks exactly the same).
This second round of printing went much better. All the letters are nice and crisp with only a few spots where the paint didn't transfer well. Much better to transfer too little though than too much. Up next- how to quilt it!
Linking up with Nina-Marie and WIP: Wednesday.


This is amazing. Thanks for sharing how you did it and demonstrating that if at once you don't succeed, try, try again. I'm looking forward to seeing how you quilt it.
ReplyDeleteThis is gorgeous! What a neat process, I'm sure the finished quilt will be amazing!
ReplyDeleteThank you for sharing your process for this! I haven't done screenprinting since I was in school, but am curious to try it again some time, the effects are rather lovely. :)
ReplyDeleteInteresting idea. I like how it looks so far.
ReplyDeleteAbsolutely fabulous! Thanks for taking us through your progress. Your tenacity is admirable!
ReplyDeleteI am really sorry you had so much trouble with this but your tenacity has really paid off. This looks very exciting and I am very curious to see what you do with it next. I have never heard of an ambigram before, but I really like the design you have come up with. I am also a great calligraphy fan, so I really appreciate your use of text on fabric.
ReplyDeleteApart from really liking what you are doing here, I am fascinated by the techniques. I have never seen such big screens or seen illustrator (a piece of software?) or silhouette. Nor have i seen this technique for making printing screens. Do you have a post where you describe the process?
I do hope the rest goes smoothly and I look forward to seeing the next step.
Awe inspiring....you've put in the hard work and it shows!!
ReplyDeleteI like them both! I like the imperfection of the first, and the color change. It was very interesting to see your technique. Inspiring. Maybe I'll have the nerve to take on my own stalled art project which has been languishing for a while due to lack of confidence.
ReplyDeleteOh you should!! I'm now trying to decide if there's something I can do with the one that didn't print well- so as not to waste it... We'll see
Delete