Friday, May 16, 2014

Bloggers Quilt Festival: Ring Around the Mole

AmysCreativeSide.com

Welcome to anyone clicking through from the always fabulous Bloggers Quilt Festival.  Super shout out to Amy for hosting and organizing it all!  I'm entering two quilts, this one in the Home Machine Quilted category.

It's called "Ring Around the Mole", and is an original design I made using primarily adobe illustrator.  It features one or more mammals from each order/superorder represented in Oklahoma (the state where I live).  My mom came up with the name and it really struck my fancy.  Not least because the moles are the hardest animal to identify so I think having them in the title really helps.

Ring Around the Mole, Shannon M. Conley, c. 2014 62" x 62"

This is the label.

In twelve-days-of-Christmas fashion, there are:

32 bats
20 armadillos
20 prairie dogs
16 opossums (with 64 baby opossums)
16 mice
12 rabbits
8 moles
4 bison
4 deer
4 bobcats
4 coyotes
(but no partridges or pears....)


Construction
The quilt is constructed entirely from apparel fabrics.  The only 100% cotton fabric used was for the backing.  It's mostly different silks and polyesters in all kinds of weaves including velvets, and some weird microsuedes (which I think are also polyester).  I also painted and used some evolon, a non-woven stuff that feels gross but looks pretty cool and is easy to work with.  The white/ivory background is a polyester bridal satin.

Each animal has a beaded eye, except the mice who have thread eyes, and the moles who have no eyes at all.  Even the bats each have two little black bead eyes you just can't see in the picture.

The quilt contains two layers of batting, one layer of cotton and one layer of wool.  It was all free motion quilted on my janome horizon 7700 home sewing machine.  All the background quilting is 100 wt. YLI silk thread (if only I could afford more of this).  The quilting on the animals is mostly 40 wt polyester (glide and isacord are my favorites).  It was actually quilted twice- the first time the animals were quilted with only the top and a single layer of batting.  Then I layered the second layer of batting an backing and quilted the rest.  This way, the animals puff in a faux-trapunto way, but still have thread quilted detailing.

The final quilt is 62 x 62 and is finished with a facing contoured with the shape of the bats.


View of the back.


This was been a fairly emotional and draining project for me, and I learned a lot about things and ways of doing things that I want to avoid in future.   I really hope you enjoy seeing it!  Many thanks to my dad Doug for taking all the pictures, it's a really hard quilt to photograph.

For more info on this quilt, check out my other posts on it, and be sure to check out all the other Blogger's quilt festival entries!

Sunday, May 11, 2014

Fiberworks 2014 Opening

I'm still here, sewing away in the background.  Just wanted to pop in to say that I have had two pieces accepted into Fiberworks 2014, a fiber arts show put on by the Fiber Artists of Oklahoma.  The show runs from May 16th to June 10th at the Individual Artists of Oklahoma Gallery at 706 W. Sheridan, Oklahoma City.

The opening is Friday May 16th from 6-9, and the show is sure to be fantastic, we have a ton of excellent fiber artists in the area and it's so wonderful to be part of a show that features so many types of fiber arts besides quilting.

The two pieces I have in the show are Do You See What I See, and S is For...#2


I hope if you're in the area or passing through that you'll stop and see the show!

Thursday, April 24, 2014

Update on the Stars

I've been working along on my large project- so far it's going slowly and without much success, but I'm persevering.  Last weekend I finished up the part I wanted to get done before leaving on my trip this weekend, so in the last few days I've pulled out a project that's been ongoing for several years now.   On Friday I'm leaving to go to Empty Spools Seminars with my mom and I'm super excited.  We're both taking a class with Jane Sassaman who I've wanted to take a class from ever since my first time at Asilomar.

Anyway, I started this project a few months after our first trip to Asilomar in 2009.  I only know that because that's where I first got hooked on EPP. I've been working on it since then off and on, mostly it was a hand piecing project to work on while traveling.  I finished the center hand pieced medallion a full year ago (ack!) and it's been pinned to my wall ever since.  The whole thing will finish around 18" square, so it's pretty small.


In the last few days I've made the floating piano key border and corner blocks which are machine pieced. I'm not really a good precision piecer, and the piano keys are 1/4" each so the variability is pretty obvious up close sometimes, but for the most part I think it turned out fine.  I love the look of the border with the center part and now all I have to do is quilt it!


Wednesday, April 9, 2014

Birthday Presents For Anna

I can hardly believe Anna has turned 2!  I wasn't able to go down for her birthday celebration but I think they had a great time.  I took a break from my giant project to make her some fun clothes.

I also made some doll clothes and accessories.  I'm a huge fan of Ikat Bag, her patterns and blog posts are fabulous.  My mom and I bought the Fairytale Doll/dress pattern and my mom made the doll and a basic dress for Anna's birthday and I made a bunch of the clothes (although not all) and the combination bed/carrying case.

This outfit was inspired by a dress we saw while shopping- super simple eyelet-over-bright.  I didn't have a pattern just like this but it was easy enough to adapt from a different pattern.  Hope it fits.  And of course, it had to have a matching dolly dress.


This dress was made of the part I cut off the bottom of my favorite dresses (I didn't like how long it was).  I had just enough cut off to make the dress for Anna and the doll dress, so now we all three can match.  The dress actually originally belonged to Becky, so it's sort of gone full circle!


This little dress is the ball gown from the Ikat Bag pattern, so so easy to put together!  Sadly I don't have the doll for you to see how it fits, but maybe I'll take some pictures the next time I'm down.  I didn't make the fairy outfit or the mermaid outfit, even though those are the two coolest in the whole pattern, I just ran out of time.  Oh well, Christmas I guess!

And then this is the carry case.  The front has a pleated zip pocket into which the clothes and dolls can be stuffed.  The back has an envelope flap and opens to reveal an attached blanket and pillow.


All in all, it was super fun to make some cute things and I hope Anna likes them!


Thursday, April 3, 2014

Finished cuttlefish

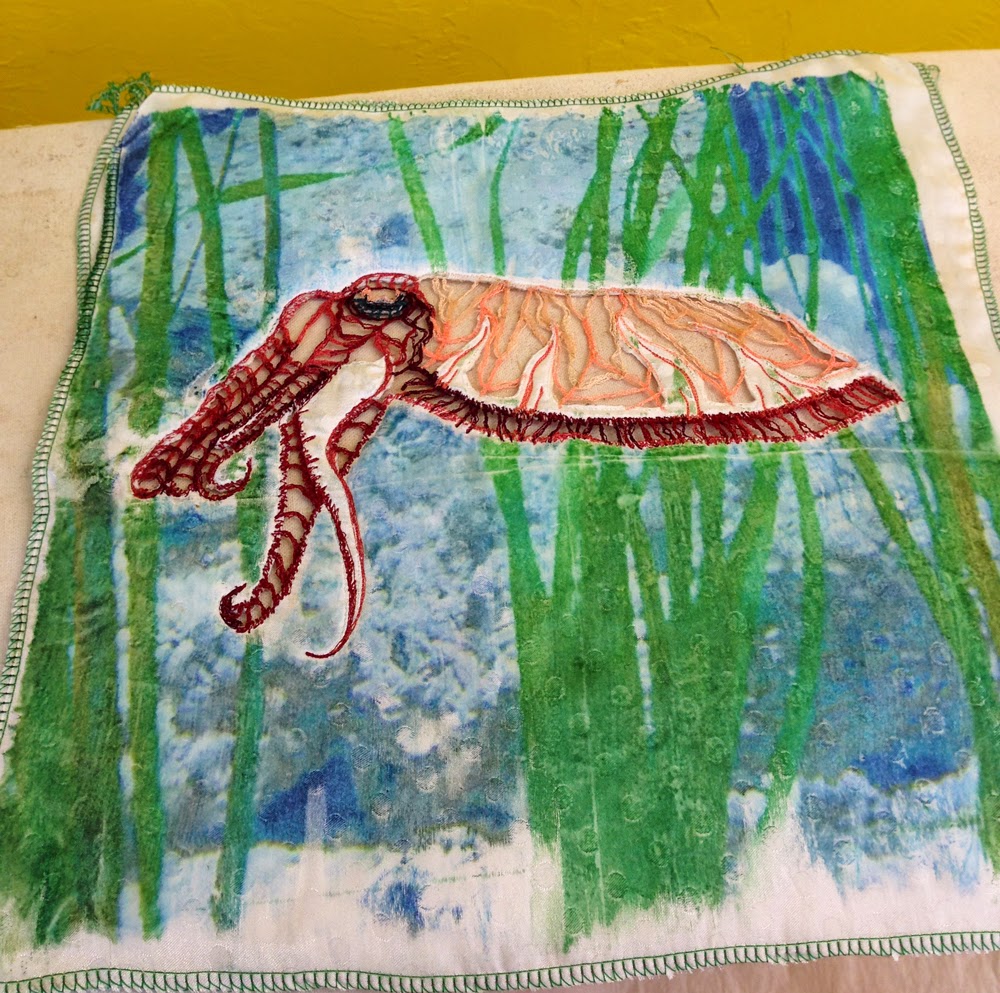
I finished the cuttlefish mini-quilt, so thought I'd share a few more in progress pictures and the final piece.

When last I checked in, I'd started the thread work on the cut-out quilt sandwich backed with water soluble stabilizer.  Here's what it looked like when I was finished with the thread work, and then after I soaked it to dissolve the stabilizer.  All the stabilizer came off cleanly and the thread was a bit floppy but held its shape ok.


The next question was what to do with the background.  In the initial picture (which I took at the Monterey aquarium), the fish was swimming through some green foliage in front of a piece of corally-looking rock.  I thought about painting it, but I'm not very good at that.  I thought about just quilting it, but I felt like that might be too much white.  I thought about trying to color and cut out some pieces of evolon or dryer sheets and applique them on top, but nothing was really very inspiring.  

Then I saw this on Judy Simmons blog.  She has a great step-by-step tutorial so I encourage you to check it out. She describes a technique where you can transfer from a transparency to fabric. Basically, you print out your picture on the transparency, then paint your fabric with gel medium wherever you want the picture to transfer, then put the transparency (ink side down) on the fabric and rub all over it.    I tried it and it worked great!  you can see below, I did not paint over the fish part, so no ink transferred there, but it transferred really nicely everywhere else.  It's a bit mottled looking and soft-edged; you wouldn't want to use this technique for crisp printing, but for an underwater scene I thought it turned out nicely.


Then I just used about six different green fabrics (mostly polyesters, silks, and velvets) to layer leaves on top, and then quilted away.  I love that you can see the green printed leaves peeking out a bit from behind.  I think they add some nice dimension.


Here's the final piece and a couple of detail shots:

Cuttlefish, Shannon Conley, 2014 12x12.


And just because spring is here, a picture of my dwarf crabapple tree blooming in my yard.


I hope you're all having a nice spring and making some fun art!  Linking up as always with Nina-Marie.


Wednesday, March 26, 2014

SAQA Donation Quilt: Cuttlefish

I'm taking a break from my big ongoing project for long enough to try out a new idea.  If it works, I'll send it in as a donation to the SAQA auction for this year.

I've been thinking about the idea of cutwork embroidery and negative space, and how that could be used in quilting in a very free-form way.  To try it out, I made a quilt sandwich in which all three layers were synthetic (i.e. backing and front polyester and polyester batting), then traced a cuttlefish from a picture I took at the Monterey aquarium a few years back.  I free motion stitched the fish outline with cotton thread, then used my woodburning tool to cut through all three layers just inside the outline.  

It worked great, the woodburning tool cut right up to the edge of the cotton thread (which doesn't burn as easily) and sealed all three layers so there were no frayed edges or loose batting.  As usual, it was pretty fumey so I did it in front of a fan by an open window.

Here it is with the fish cut out.


After cutting out the fish, I put two layers of water soluble stabilizer under the open areas and just started thread painting.  This is as far as I've gotten- I'm trying to get enough thread on there that all the edges will be connected (and nothing will be floppy) but still leave a fair amount of open space (since that was the original idea).  I have no idea what's going to happen when I put it in water to remove the stabilizer, but keep your fingers crossed!


It's been really fun to work on something light-hearted, low stress, and relatively unimportant.  I'm linking up with Nina-Marie!


Thursday, March 20, 2014

Show Announcement: Beyond Tradition

Hi all, I just wanted to pop in to say that I have several pieces in a SAQA New Mexico regional show called Beyond Tradition.  It's being held at the Hubbard Museum of the American West in Ruidoso Downs, NM and runs from April 5-September 1.  If any of you are traveling through southern New Mexico, you might check it out!


I'm privileged to have three pieces hanging in Beyond Tradition: Winter in Lincoln County 2: Sierra Blanca, Winter in Lincoln County 1: The Orchard, and Ring Around the Mole.

Concurrently hanging at the museum are A Walk in the Wild and A Color Runs Through It, so you can also see Seymour the Coelophysis, Taming the Gorgons, and Black and White and Read All Over.

Many thanks to Betty Busby who has worked really hard to make this happen, and also to everyone else who helped including my super Mom who has been the local contact for it.  


Monday, March 3, 2014

Minky Blankets

I know more  minky blankets are not particularly exciting, but in the interest of documenting my projects I thought I'd do a quickie post about some I made last year and never got around to sharing.  One for a brand new baby (I adore that bug print from one of Jane Sassaman's old lines), and one for a terminally ill friend who has since passed away.


Monday, February 24, 2014

Weekender Bag for Mom

Ever since my mom saw my Amy Butler weekender bag, she's wanted one as well.  So for Christmas (which for this bag came in early February) I made her one.  I followed most of the same tips that I did the last time, you can see them summarized here.  The only thing I didn't do was make a shoulder strap- surprisingly I don't use mine all that much (the weight of the bag distributes weirdly on a single shoulder strap).  On this one I just lengthened the handles so they're long enough to carry the bag over the shoulder.  I think it turned out even better than mine, and I think my mom likes it!  


One of the coolest thing about this version is that I turned the zippers around.  I had to get a parka zipper which has the zips in a tail-to-tail orientation, rather than a suitcase zipper which has the zips in a head to head orientation.  I saw some things on line that indicated you could turn them around (provided it was s non-separating zipper), but I couldn't really find any instructions.  I thought I'd be brave, so I just cut both ends off the zipper, pulled the zips off, and put them back on the other way around.   I have no idea whether that's the right way, but it totally worked, and now the zipper opens from the middle like a real suitcase!


Possibly the most exciting thing about this project is that I didn't sew over any fingers during its construction (yay)!

Tuesday, February 18, 2014

WIP Wednesday

Hello blogland!  I've been busy working (in the lab) and designing my Eucharistic Prayer C Quilt.  I can't show it, even in progress, but at this point, it's not even recognizable as anything, so I thought I'd go ahead and share.

It's taken a ton of design work to get to this point, but I'm now ready to screen print my first text.  Here's my background fabric all marked (the blue lines are registration lines to align my screens).  This is just the left panel, there's a right panel I haven't marked yet that's the same size.

isn't that the most boring in progress picture you've ever seen?

And these are all my silk screens.  They're made out of fusible vinyl (the black marker is scribbled on the vinyl before cutting so you can see it since it's clear) and then fused to organza.  I kept all the letters I peeled out of the screens- I'm bound and determined to do something with them but I'm not sure what yet.


I also painted this chiffon planet, but I'm really not sold on it- we'll see later whether I decide to use it, and then there are a few initials I sketched out that will be incorporated later as well.


I'm hoping to start printing tomorrow or Friday so wish me luck!

Linking up with Lee and Nina-Marie as always!