Monday, January 30, 2012

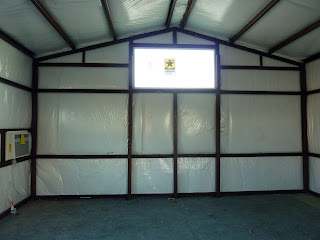
The studio is..... functional! Hooray!

I promise that soon there will be more crafty posts on here, but for now everything is so crazy I haven't been sewing at all.  I thought I'd just pop in and give you guys an update on what we have been doing; working on the studio!

Mike is the true hero of the story, after painting and painting and painting, he then installed all the flooring (on two consecutive days) all by himself!  It looked so lovely and pristine and wonderful.

On Saturday we assembled shelves and moved all the furniture in (in anticipation of some work that will be done in the house this week).  It took the whole day and into the night, but the studio is now completely functional.  I even have my apple TV and DVD player hooked up.

I sewed my first stitches in it on Saturday afternoon, sadly nothing exciting, just some minor repairs to a tote bag I found while cleaning up.   We still don't have a cutting area (which will be in the center of the room) or the design wall (which will be in front of the shelving) but my parents are coming out in a few weeks to help with that.  The most striking thing about the space is how open, light, and airy it feels although that may change as we fill it up with things.


Thanks so much for stopping by!  More sewing soon!

Wednesday, January 25, 2012

WIP Wednesday: Spicy hot goings on!

Lots of works in progress this week, but not too much progress made on any of them.  As I mentioned Monday, we're doing a bunch of stuff in the house while we're finishing the studio, so most of my time is spent moving furniture or baking as a thank you to Mike who's been super awesome about painting.

However, I did want to show one in progress project I started over MLK weekend.  It's a three-dimensional super textured chile ristra quilt.  I'm mostly following a pattern I got from my friend Evelyn, and even though I don't often make quilts from patterns I really loved the look of this one.  The pattern is called Chili Peppers by Arlene Walsh Designs.  Anyway, you make the background and borders first, then quilt it and bind it and put the chiles on last, so it's not too exciting to look at in the beginning.

I made a sort of sawtooth HST border using red-green-orange strip sets instead of the blocky border in the pattern and used a linen for the background.  The red piece you see on the background is called the "under chili" which I think is fabulous because it reminds me of someone's grandmother giving a lecture about proper foundation garments.  It's purpose is just so you don't see linen color through the chiles on top.

I marked a brick pattern in blue water soluble pen as a guide for my FMQ and had barely started quilting the bricks when my sewing room was torn asunder by the abovementioned  house chaos.


In the pattern they say to use red fabric for all the chiles since that's what color chile ristras usually are, but I thought that would be too boring for me.  I almost went with sort of a rich pink with red undertones, sort of chiles-done-in-brights, but then I decided it would be a good challenge for me not to work in brights.  I therefore decided to use muted realistic chile colors but multiple colors (red, green ,and orange) as a compromise against boringness.

I hope to get back to this soon, but I've signed up for some swaps so I think those will have to come next if I can ever unbury my sewing stuff!

Monday, January 23, 2012

The studio is..... colored?

Things have been pretty crazy lately in our neck of the woods, so I haven't been sewing quite as much as usual.  One of the things that's been keeping us busy is the new studio project.  I'm so excited its finally coming along and am very anxious to get moved in.  To make things more chaotic, we've decided to take advantage of the general moving-around-ness to do some other small home renovations, so things inside the house are all in an uproar.  The dogs aren't quite sure what to think.

Anyhow, I just thought I'd pop in and share a few updated pictures from the studio.  When last I checked in,  it looked like this


The next step was to have it framed which happened just before Christmas.  Then the electrician came, and then the framer came back to do the sheetrock and tape and texture, and then the electrician came back again, etc.   Finally, today Mike and I painted.  It took us all day, but we got one coat on all the walls.  I painted the center truss with several coats of white spray paint since it was just bare, so now it blends in better with the walls.  We'll be putting on at least one more coat of the bright yellow on the back wall, but we're definitely making progress.  Special shout out to Mike who did most of the hard painting including the whole giant ceiling!


It's kind of hard to tell since Mike was madly snapping pictures after it got dark as I finished up some last painting, but the yellow is bright saturated crayola-8-pack-first-grade-color-wheel-just-plain-yellow yellow.  It's the brightest yellow I could find with as little green or orange undertone as possible.  The color is great and after one more coat I think it will look much awesome.


 For anyone local, my electrician was Feegee Matlock and my drywall/framer was James Henslee.  They were both awesome and I'd recommend them for sure.

 Any of you have ongoing renovations?  Home improvement projects?  New studios?

UPDATE:  You guys!  You will not believe the awesomeness!!!  While I was at work today Mike painted the whole building again white and yellow as a surprise for me!  It looks fantastic super-duper wonderful.  He's such a sweetie.  Then he sat down on one of the dog poofs and scrunched around on the floor with a scraper scraping off all the texturing compound so we would have smooth floors to lay the laminate this weekend.  How blessed am I to have such a guy!


Wednesday, January 18, 2012

Purple People Eater

Previously I posted about this purple medallion quilt that has been in my UFO list for longer than any other item. Years in fact.  Over Thanksgiving I did the stabilizing quilting and stitch in the ditch on my mom's longarm and I finished the rest of the quilting while I was there over Christmas.

I'm so excited to have finished it, but the quilting didn't go nearly as well as I had hoped.  I actually had a mini-meltdown about it before just deciding it was an old quilt anyway, and wasn't going to be perfect.  I wanted to put octopuses in the corner blocks in some contrasting thread;  I figured they could be flowy and wouldn't look weird if they didn't match each other, but in the end they're a bit busy for the quilt and show lots of mistakes.


In the center medallion, I just put different fillers in every two sections.  I used a fairly blendy light pink thread (all the thread for quilting is, Isacord which I love).  Some of them look ok, like these two, and some look terrible. Sorry, not going to show close ups of those sections!


I am fairly pleased with the green leafy border pattern; I've put that pattern in every quilt I've quilted on the longarm so I can do it fairly well.


I'm also pleased with the feathers I put in in the dark purple blocks.  I put a long swirly curvy line through the blocks and then feathered along that as a stem, filling all the space.  Since I used a dark purple thread, you can't see it very well on the front, but on the back it stands out better (second image).


Here's the final quilt, it's too big for my design wall so was very hard to photograph; the whole left side was sort of hanging off into space.  It's actually pretty square although in spite of my best efforts the corners are a bit stretched.  I'm so pleased to be finished with it and am anxious to cuddle underneath it on the sofa.

Purple People Eater c. 2012 Shannon Conley 60" x 78"


Any of you out there finish looooong-time UFOs lately?

Monday, January 16, 2012

Mug Rug for Mom

One last Christmas present post for you all before I wrap up the 2011 holiday season.  I've seen this style of patchwork before and have wondered how to do it.  I was therefore super excited to see Janet Somerset's guest post and tutorial for these cards on Sew Happy Geek.  I originally thought I'd make one of these into an ornament for my mom, but then decided on a little mug rug so she could have it out all year.  I followed the instructions on the tutorial exactly and it worked out perfectly!  

I tried really hard to make it using calm non-bright colors, and I think it turned out well.  My mom really liked it as well.

Here it is in progress and then finished.


Are you guys about wrapped up with Christmas/Holidays 2011?

Friday, January 13, 2012

12th Night Costumes

For the past several years our church has hosted a Medieval 12th Night festival to raise money for local Norman charities.  As the 12th night is the twelfth day of Christmas/Epiphany, it's almost always the first Saturday after the first of the year.  While this is as close to accurate as possible, it is a pretty inconvenient time of year for a big event requiring lots of volunteers and organization.  Everyone is usually just getting over the holidays and of course all the lead up time most people are likewise very busy preparing for Christmas.

However inconvenient the timing though, the actual event itself is pretty fun.  It's theoretically set in 1470 and we have a very yummy Medieval meal, funny skits, and period music provided by the choir (of which I am a part).  The choir also fills the roles of the royal court so has fancy dress costumes.  

In the past we've borrowed or rented costumes from the OU theater department and from a church up in Oklahoma City that does a similar event (at a different time), but this year we started making costumes for the church to have.  I was in charge of this sewing and gathered together a fabulous group of ladies (and three young girls) who were willing to sew.  I bought fabric, patterns, notions, and trim then made up kits for each sewer so each could make her assigned costume.  We were six sewers and we made 4 lady costumes and 2 man costumes.  Next year, hopefully we'll make just about the reverse and that should do it.

I made the costume for our choir director and it was somewhat challenging since I haven't made clothes in ages. 


After doing some alterations, I think it fits pretty well, here are some pictures my friend sent from when she tried it on. 


I was so thrilled with all our contributing sewers; everyone came through brilliantly.  Some people were relative beginners while others were true experts.  Several of the costumes are just exquisitely finished and assembled; way nicer than anything I'd ever make.  Shout out to Ms. Mike Mcgehee, Ms. Helen DeBolt, Ms. Christie Godec, Ms. Kathy Mills, and Ms Vicky Bratton, you guys are awesome! The three young ladies in the front row were all interested in learning how to sew so we got together and I helped them make simple costumes to wear at the feast.  I've blurred their faces so as not to spread them around the internet, but they did really great!


And here's a picture of all the choir members wearing the fabulous new costumes.   The costume I wear is one I made many years ago and its sadly somewhat small now.   Some of the others are also old or borrowed from other sources but the gentleman on the left and all five people on the right are all wearing newly sewn costumes.


Any of you been sewing costumes lately?  It's pretty much the wrong time of year for that I guess, but we were pleased to get these made.

Wednesday, January 11, 2012

Make your own silk screens

My mom and I typically like to try some new surface design or dyeing technique over the holidays and this year we decided to try silk screening.  We'd always avoided that in the the past since it seemed really complicated.  The photo-emulsion stuff is pretty specialized and the whole process seemed a little involved.

Excitingly, in the October/November 2011 issue of Quilting Arts we found an article on easy make-your-own silk screens by Enid Gjelten Weichselbaum.  Basically, you take a piece of iron-on vinyl and cut your desired pattern out of it then attach it to a piece of organza.  There's really nothing more to it; we did put masking tape around the edges but that was it.  Squirt a little silk screen paint on it and squeegee away with a credit card.   We used plaid silk-screen paints as well as setacolor fabric paints thickened with a little bit of sodium alginate.  We did find the process worked best with small screens (smaller than about 5x7); any larger and the prints weren't as clear because the organza was really floppy.  I think for bigger prints it would be better to have the organza on stretcher bars as in traditional silk screening.  This technique was really fun and easy though for small screens and printing!

Here's one of my first screens and the initial test prints we made on muslin.  We made our screens on purple organza because it was on sale, it didn't seem to matter any in terms of the print quality.


I initially made two screens vaguely inspired by my bathroom wallpaper, and I decided to make a medallion pattern with them.  We initially tested on muslin, but I printed my medallion on some sort of pre-washed white-with-green sprinkles batik I found in my mom's stash.  Here are a few shots in progress. The blue lines are water soluble marker I used just to line up the medallion wedges.


Here's my final medallion.  I discovered that you can easily tape over some parts of the screen if you just want to print one section of it as I did with the outer green tear drop shapes.  I'm not sure what I'm going to do with this; incorporate it into some art quilt I'm sure.  It reminds me of spring though and I'm pleased with how it turned out.


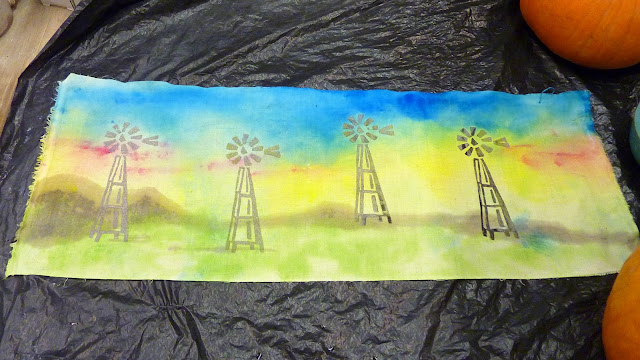
My mom did a windmill screen the first day.  She has some ongoing windmill projects incorporating both traditional an modern windmills.  Here are a couple of the things she printed.  In the first one she's going to applique a large modern windmill in the foreground.  This was standard printed fabric and the screen printing worked fine.  In the second one she was experimenting with painting the background with setacolor after screen printing.  The screen printed images acted like a resist and weren't covered with the background paint.


Finally, my sister asked for a printed bib for the baby, so we tried screen printing on the knit/terrycloth fabric that little bibs are made out of.  It worked just fine!


We had so much fun the first day, both of us made more screens the second day.  My mom made a bunch of different sized leaves and printed them on some fabric she'd previously hand-dyed.  I forgot to take pictures of it; it looked really cool, but that was how we learned that the larger screens didn't work as well.  The larger leaves got kind of blobby and didn't print as crisply.

The second day, I used a piece of commercially printed fabric which had a subtle brown-pink-blue rose pattern and some little white specks on top.  Before I printed on it, I painted the background with setacolor paints.  The little white speckles acted as a resist and showed up on top of the painted surface.  I then made a bunch of quail screens and printed a whole family of quail.  I'm not quite as crazy about this one as the medallion, but the quail are fun.


This was a super fun project, much less messy than typical dyeing projects although you do have to have a sink to rinse the screens.  They can be reused multiple times and the technique was very easy. Here are my mom and I mid-laugh; you can tell by the silly picture that we were having fun!


I encourage you to snag a copy of the magazine and try it out!  Anybody else do fun-easy surface design techniques lately?

Linking up with Works in Progress Wednesday, maybe the great ladies over there will have some suggestions for what to do with these dyed panels!
Monday, January 9, 2012

Plans for the New Year!

I'm not a big fan of new years resolutions, but I do like to make goals for the new year and think a little bit about what I've accomplished in the previous year.

Back in June I wrote a post on my in-progress but unfinished projects.  I've tried really hard not to start any new big projects and have made good projects on these.  I thought it would be good to update and start a new list for 2012.

1. Purple Medallion Quilt:.-Update completely finished!  Final blog post to come soon.
2. Hawaiian Applique Quilt: Update-Completely finished!  I think I'm going to donate this one to the women and children's shelter in Ruidoso.
3. Dog Portraits: Update- no progress here.
4. Nativity Mosaic Quilt: Update- no progress here.  I've decided that regardless of other projects, I'm going to start working on this one in July so it will be finished by next Christmas.
5. Visions of God Group Church Quilt: Update-Completely finished!
6. Large S Quilt: Update-Completely finished!
7. Small Caryl Fallert Blocks: Update-Completely finished!
8. Grandmother's Flower Garden Project: Update- I used a few of these blocks for Christmas mug rugs but then pieced 10 more.  I think I'll just keep them around as happy blocks to use as needed.
9. Miniature Whole Cloth Quilt: Update-Completely finished!


So, only two main projects left as UFOs at the end of 2011.  They'll go at the top of my list for 2012.  My overall goal in 2012 is to focus on my larger quilt projects as much as possible.  I love to do small, finish-it-quickly projects too, they give such a sense of accomplishment, but they do delay progress on my more involved stuff.

UFOs/Projects already started going into 2012 are:

1. Dog Portraits
2. Nativity Mosaic Quilt
3. Super-secret Embroidery Project
4. Crocheted Sweater
5. Silk-screened Prints
6. Studio!

Large/Currently Planned New Projects to tackle in 2012

1. Diaper bag for Becky
2. Swap quilt for blog name swap over at Samelia's Mum.
3. Still Life Art Quilt
4. Granny Square Sampler
5. Amy Butler's Weekender Bag
6. Baby Quilt

I'm sure there are more, but these seem like enough to start with!  Kudos for anybody still reading after all this wordiness!  I appreciate the space to work out my thoughts and plans.  I hope you all are looking forward to creative exploration in 2012!

Friday, January 6, 2012

Christmas Giveaways

Today I just want to give a fabulous thanks to the ladies who sponsored the giveaways I won before the holidays.  As part of the big giveaway weeks over at the Quilting Gallery and Sew Mama Sew, I entered many many generous giveaways, and was lucky enough to win four.

Thanks so much to Andrea over at Stitch Parade from whom I won this adorable clutch.  I love the gold accents in the fabric that pick up the frame.  It's fabulous and now residing in my giant purse from whence I can retrieve it for any time when I don't want to drag the whole bag around.


Thanks also to Sally over at Sally's Quilting Corner who gave away a yard cut of this cute green fabric.  It's perfect for my stash,  I don't have very many lights, and this green and white print is perfect.


I was also lucky enough to win this little plaid pouch from Kathy over at Running With Rocket.  I really love the black plaid; I'm always too chicken to use plaid since getting it lined up can be a challenge.  This is super for carrying around hand projects and I was very excited to win it.


Finally,  Diane over at Random Thoughts do or "di"  sent this fabulous frame bag, a bunch of great patterns, and a really generous pile of large scraps because I won her giveaway by guessing her favorite Christmas song/artist. The bag is really large!  When I saw it on the giveaway link, I thought it was like a coin purse, but it's really much bigger, maybe 10 x 10 or so.  I have the perfect set of stuff to put in it; I've been looking for a pouch that size for some time.  I love that orange polka dot fabric on the inside and it even has a pocket!


So many many thanks to these wonderful ladies.  I was so excited to win some giveaways, and next year I will definitely join in and sponsor one.  The whole event was very fun!  All four of these ladies have lovely blogs, you should definitely peek in and check them out!

Wednesday, January 4, 2012

S is for Finished!

Ok, so S isn't really for finished but I am so excited.  I finished this quilt right before Christmas just in time for the deadline for the Oklahoma City Winter Quilt Show.  Any locals should head out and see it the weekend of January 12-14.   I feel like I've been working on this one forever but I'm really pleased with how it turned out, and I feel like I put a lot of work into making sure it turned out nicely with minimal mistakes.  It may sound weird, but I feel like I've done the best I could do with my current skills, and didn't cut any corners and that makes me proud.  For anyone interested in my (many) previous posts about this quilt, you can check them out (1, 2, 3, 4).

Sorry for the overabundance of pictures, I'm just so excited I have to show you bunches of them!

S is for... #2, c. Shannon Conley, 2011.  27.5" x  30.5"


I'm linking up with several of the regular places and also Works In Progress Wednesday, even though this isn't in progress any more.  The ladies over there have been so encouraging throughout this process I want them to see the finished thing too!  Rest assured there will be more actual WIPs next week!