Friday, March 30, 2012

Wild Olive Stitchery Swap

As an equal opportunity crafter, I love to occasionally do things other than sewing and quilting.  In keeping with this, one of my (many) favorite blogs is Wild Olive, where Mollie always has adorable crafts, printables, and most of all embroidery.  She's currently hosting her first swap ever and even though I promised myself no more swaps, I couldn't miss this one.

We were each assigned secret partners and asked to stitch up/finish a 4" hoop project.  The flickr group for this swap is pretty impressive, on my best days I'm only what one would consider an "advanced beginner" in embroidery, and many of the participants have made some really really beautiful things.  Anyhow, my partner said she liked teacups and pink/yellow/green, so I drew up this little teacup man and stitched him onto a fun piece of textured yellow linen I found in my scrab bin.  I put little embroidered flowers around the edge (the petal stitch is one of the only stitches I know) with individual seed beads in the center of each one.  I tried to use a more sophisticated, spring time pink/turquoise/yellow/green color scheme rather than my default "bright" choices, and I think it turned out ok.


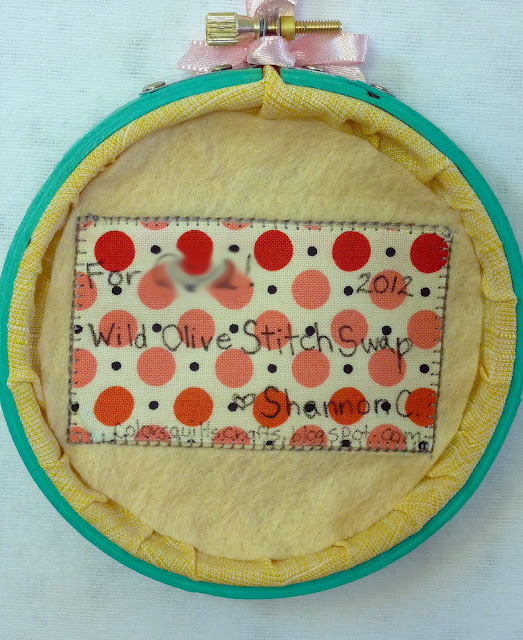
As the hoops were to be finished and prepped for hanging, I painted mine turquoise (instead of bland wood brown color) and followed this tutorial for finishing the back.  I used felt instead of card and made a label for my partner.  Unfortunately,  I used fusible to attach the label to the backing felt and somehow the felt shrunk up and was too tiny to fit in the back of my hoop.  I had to peel off the label, make another backing and then sew the label down.  I am definitely a novice when it comes to felt.


I think it turned out cute and I really hope my partner likes it.  I feel kind of bad that it's so simple.  Instead of making a zip pouch to include as an extra, I made a fun sort-of-flower pincushion (which reverted back to bright colors).  At some point maybe I'll make one for me, but as I mentioned on Wednesday, no more tiny projects until I make good progress on the big ones!


Wednesday, March 28, 2012

WIP Wednesday: Poof Poof Poof Poof

I love the way the word "poof" sounds when you say it out loud;  like a bubble popping out and flying off into space.  In any case, much better than "foot stool" which is terribly mundane.  To be honest, I'm not sure whether the poofs I'm talking about--that is, the kind that are also called foot stools--are technically poofs, or poufs, or maybe even puffs.  Regardless, I finished the one I was working on, made using Amy Butler's Gum Drop Pillow pattern (I guess she wasn't sure about the poof issue either).

I've actually been crafting and sewing like mad lately, a little to my detriment to be honest.  Sometimes it starts to feel like another duty, rather than something I do for fun.  As though soon the crafting police are going to chase me down and reprimand me for lack of productivity.  I've been doing lots of small projects, but as of now am stopping to focus on the design and execution of my next big quilt (the dinosaur).  It's hard for me to get started sometimes when a new big project requires lots of thought and time and investment of creative energy.  When I only have fifteen minutes, my instinct is "Oh let me go quickly make an adorable pincushion" rather than "I have time to sketch three bones on this giant pre-pattern drawing".  In the end, I love the end result and the design process of making larger, more involved art quilts- I just have to force myself to focus when I can.

Sorry for the random diversion;  hopefully those of you who aren't interested in my inner monologue have skipped on to the pretty pictures!   Here's my finished poof- I absolutely love it.  The white print is Kate Spain and the black print (my current favorite fabric of all time) is from Jane Sassaman's Prairie Gothic line.  In the pattern the eight pieces are assembled in an alternating fashion, but I went ahead and put two pieces of each fabric together (so that it alternates by quarters) because I wanted the repeats on the Jane Sassaman fabric to stand out.


I made the bigger of the two poofs in the pattern, and it is really very big. Perfect for perching on in my studio when I've tossed a pile of stuff in the chair.  I lined the pieces with fusible fleece to make them a but sturdier and added piping between the alternating quarter sections (still haven't quite worked out how to do proper piping-any suggestions would be awesome).  I couldn't believe how much stuffing it took to fill it! My mom brought me a kitchen size garbage back filled with tiny batting/fabric scraps, I had 4 walmart sacks completely stuffed, my sister gave me a roll of twin sized polyester batting, and I had about 7 24" practice FMQ sandwiches.  All that stuffed in there and I still had to buy another bag of polyester fiber fill to finish fluffing it out.

I'm so glad I finished it, the pattern was really very easy to follow and the poof was easy to assemble.  I'm already enjoying it- I just hope the dogs keep away.  Nothing in the studio matches, I love all the mixed up bright colors!


Linking up with Lee over at WIP Wednesday as well as Sew Much Ado: We did it Wednesday.

For this week:


Finishes:
Amy Butler Poof
Minky Blankets (2)
Embroidery Hoop and Pin Cushion for Wild Olive Swap

Progressing on:
Dinosaur Quilt (design phase)
Easter Dress for me (almost finished)
Crochet Flower Blocks (just chugging away)

No Progress on:
Dog Quilt
Nativity Quilt
Baptism Gown
Upcycled dresses

How are you guys doing?  Feeling craft-overwhelmed-ness lately?  Any good solutions?
Monday, March 26, 2012

Dallas Quilt Show Recap: 2

Today I have a few more of the quilts that I really loved from this year's Dallas Quilt Festival.  I've listed the maker of record for each quilt and listed their blog/website if I could find it.  If I've posted your quilt without your blog, just let me know and I'll add a link!


Peggy Sympson, Southlake TX


Barbara Ann McCraw, Denton TX  Quilter: Johanna Iaia


I really love the spirograph style quilting on this one and the way it complements the piecing and lends to the feel of an optical illusion.

Sarah Francis, Greenville TX.  Quilter Jackie Brown


Teresa Sherling, Denton TX


Andrea Brokenshire, Round Rock, TX

This orchid quilt is huge and absolutely stunning in person.


More to come another day.  Hope you enjoy!

Friday, March 23, 2012

Dallas Quilt Show Recap: 1

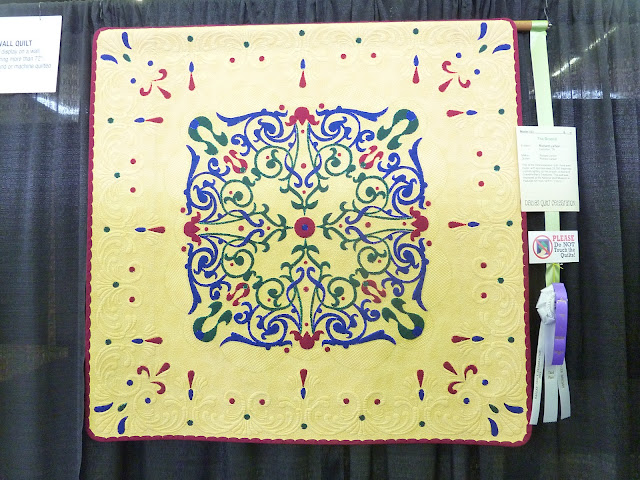
I don't know about you guys but one of the best things about going to the large quilt shows is seeing all the beautiful quilts that others are making.  I'm always awed by the wonderful workmanship and all the fabulous things that are different from the kind of quilts I make and those that most of my bloggy friends make. Last weekend was the Dallas Quilt Festival and as always I took tons of pictures.  I thought I'd do a few recaps, hope you enjoy!  There were so many fabulous ones,  these are just a few of those that stood out to me.  I've listed the maker of record for each quilt and listed their blog/website if I could find it.  If I've posted your quilt without your blog, just let me know and I'll add a link!


Pat Connally, Midland TX


Sheri Mecom, Bedford TX


Emily Roney, Duncanville TX


Sharon Schlotzhauer, Colorado Springs CO (Not sure if you can tell, but the center of the flowers is 3-dimensional!)


Richard Larson, Plano TX,  I love the sparkle on the appliques and his quilting which is always lovely.


Terri Krysan, Lakeville MN


Linda Neal, McKinney TX, I love these parabola blocks and the fabulous quilting.  I was especially intrigued by all the stars in the quilting.  It's really a lovely intense blue, my flash just washed it out a bit.


More tomorrow!

Wednesday, March 21, 2012

WIP: Chile Quilt Finished!

I have bunches of things ongoing with no progress, the dog quilts, the Amy Butler Pouf, and the bobbin quilting blocks just to name a few.  I am making a little bit of progress on the dinosaur quilt.  Not actually progress but I went to the dinosaur museum and took a bunch of pictures.

Anyway, the big news this week is that I finished the chile quilt!  I love it!  It was a fun project, and I enjoyed doing something that wasn't for a show or a specific deadline or purpose other than that I liked it.  My friend Evelyn made a quilt using this pattern and I loved it.  I finally got around to making it and it reminds me of New Mexico and home.

When last we saw it, I'd pieced the top and appliqued down the under chile.  The next step was to quilt it and bind it.  I drew out a brick pattern in the background and quilted it along the lines using brown, red, green, and orange thread.  Then I bound it using the same green batik I used for my HSTs and some of the chiles.


After finishing the binding, the next step was to make the chiles.  To make the chiles, the first step was to tightly ball up the fabric, tie it with rubber bands and run it through the washer and dryer to ensure that it was VERY wrinkly.  Then I smoothed it out just a bit, ironed fusible to the back and traced the chile template.  After cutting out 72 chile halves, I realized that I was supposed to add seam allowance to the template.  Way to read the instructions.   The problem with not having added seam allowance is that the next step was to sew two halves together and turn them, and without the seam allowances the chile bottoms were so tiny they were nearly impossible to turn.


I wound up sewing them together with a tiny scant 1/8th inch seam allowance.  After sewing them together, I slit open the backs, turned them and ironed the open flaps back down.  Since the back of the chile won't be seen, you don't have to even sew the backs down.  After ironing, they just stick down nicely because of the fusible.

After getting them all turned, I tried out a couple different arrangements, then stitched them onto the quilt and added a cute bow with some scraps of leftover jute.  Most chile ristras are all red, but chiles come in so many colors, I had to pick a few at least!  I love the dimensionality of it.


Hope you enjoy!  You guys working on any nostalgic projects?  Any 3D or high-texture techniques?

Sunday, March 18, 2012

Name Game Swap Package

As you may know, I participated in the Name Game Swap over at Samelia's Mum.  It was super fun, and I enjoyed making a fun quilt for my partner.  Last week though, I got a package from my partner,  SewLindaAnn. It was superb!!  In addition to the swap quilt which I'll get to below, she sent me this great book on blogging, a bunch of fun fabric that will make a fun addition to my stash (LOVE those bright colors), and a bag of the fruity tootsie rolls.  I love those!  I had no idea you could get them without the rest of the mix.


But, by far the best part of the package was the wonderful name quilt she made me.  I love the swirly fabric contrasted with the linear piecing, and so many yummy bright colors!   She embroidered each letter of my blog name on the little orange squares, and appliqued them on the top.  The big-stitch hand quilting is wonderful too, it so nicely complements the fabric and overall design, and along with the different scales of the prints, adds a fun feeling of texture to the whole piece.   She said her goal was to combine my loves for art and science, and she really succeeded! I think my favorite thing about it though is how unique it is.  Not because of the name, (which is obviously specific for me), but because of the design and style. 

It felt like this swap was full of wonderful things, people seemed to be really trying to figure out what their partner would like, and Linda really hit the nail on the head.  As I was stalking the flickr boards during the swap, there were a bunch of cute things that popped up that I would have loved, but none of them were quite my style.  I feel like Linda designed and made a better quilt for a brightly-colored-wannabe-art-quilter than I could have ever done.  She was such a thoughtful partner.


One last note,  Linda incorporated fabrics from an artist from Art of Possibilities Studios.  They partner with disabled artists to produce fabric lines based on their art work.  It's a really cool deal, and some really amazing fabrics have been generated.  At first I thought one of the fabrics was from George Mendoza's fabric line with Art of Possibilities.  He's a fabulous painter from the same town as my Mom's LQG, and they did a challenge last year with his fabrics. In the end, I think the ones Linda used are from a different fabric line, but  you should totally check it out the fabrics from Art of Possibilites, and George Mendoza's new line with Free Spirit.


Thanks so much to Linda and to Anorina for hosting the swap.  Anybody interested,  I think she's planning to host another Name Game swap later this spring.  It was bunches of fun, you should totallly participate.