I finished this quilt just in time for and end-of-January entry deadline, and delayed showing the final quilt lest I jinx it! In the end it didn't get into that show, but I recently found out that it has been accepted into Fiberworks 2016, a show here in Oklahoma City. For any locals, please join us for the opening, next Friday (July 15) from 6-9 at the IAO gallery at 706 W. Sheridan.
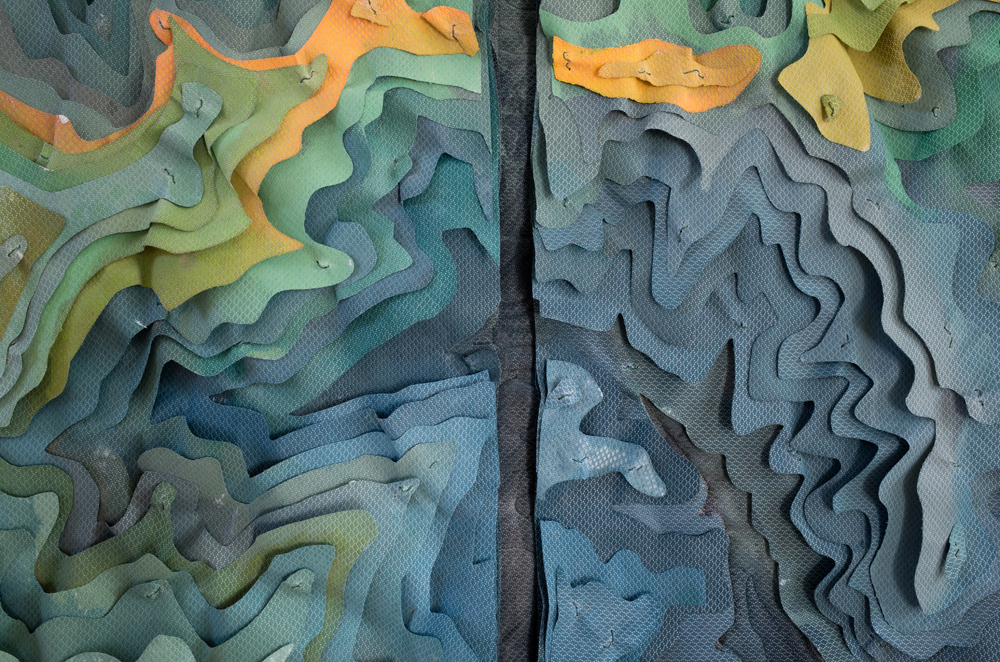
It's been a while since I talked about this quilt; I designed it to depict my favorite section of my favorite childhood hiking trail, Crest Trail #25, from Monjeau (which falls more or less at the top right/northeast) to the base of Ski Apache (which falls on the bottom left/southwest). Each layer of fabric coordinates to a 160 ft elevation topo line from the USGS maps of the White Mountain Wilderness in New Mexico.
I talked before, here in detail about how I painted the fabric and cut and assembled the pieces. But for anyone who is just checking in, all the fabric was hand painted, after cutting but before assembling. The background (with front-batting-backing) was free motion quilted first, and then painted and used as the base on which all the layers were assembled.
Topography #2: Crest Trail, c. Shannon Conley, 2016, 42 x 28 x 4
Each of those funny spots that looks like a big stitch on the front is a place where the wire comes through all the layers. Between each layer a pony bead is strung on the wire to prevent the layers collapsing on themselves. Many thanks to Mike for taking the final pictures.
So this is my tribute to one of my very very favorite places in the whole world. The number of memories I have hiking this trail is too many to count. The colors, while obviously not realistic are meant to capture the transitions this trail goes through- many forested areas with either old growth or new growth forest, as well as open, treeless saddle areas where the green grass quite quickly turns to golden yellow in our dry New Mexico climate. Unfortunately, the area was devastated by a forest fire a couple years back, and now looks very different.
Making this was both a technical challenge and a wonderful mental and emotional exercise. I love the way it turned out and wish I could spend more time there. I hope that some of you can get out to see the show at IAO, Fiberworks is always great. It features tons of different types of fiber art, not just art quilts.
Linking up with the fabulous Nina-Marie as always!
I've been working along on my new topography quilt, and thought I'd share a little bit about how I'm actually assembling all the layers.
This is the quilted background after I painted it. Don't fret about it's wretchedness, most of it will be covered up by layers. I only painted the middle sections because the paint does stiffen the fabric a little bit and I thought that might be helpful down the road.
Here you can see that I've strung about 30 pieces of flower wire through the quilt and back up to the top. In each case about 8" or so is sticking up. It took a fair amount of marking on each layer and on the base to get these in exactly the right spot to go through all the layers, but sadly I neglected to take a picture of that step. Each piece of wire has a plastic bead on it which will make the layers stay separated.
Here you can see that I've threaded the first layer (8000 feet) onto the middle section by poking the flower wire through the fabric layer. I've put another set of beads on in preparation for the next layer.
Here you can see I've paused midway through putting the fourth layer on so you can gen an idea of how it assembles. All those wires get kind of tangled up but are way easier to deal with than 30 threads going at once (how I did it last time) which was a nightmare.
And skipping ahead about 8 hours, here you can see that I've finished assembling all the layers on the middle section and have moved on to the next section. This whole process was a bit hard on the fingers, and the flower wire was a bit hard to poke through the fabric, but it worked. After building up all the layers, I threaded the ends of the wire back through to the back of the quilt, twisted the two ends together, and then buried the ends individually. That part took forever, and unfortunately I pulled some of the wires too tight and still have to go back and undo them so the front isn't crushed.
In any case, you get the idea! So far, I'm loving the way the layers ripple. Hopefully I'll get it finished soon since the show deadline which I'm aiming for is coming up quickly!
My patiently-waiting-long-suffering large Eucharistic Prayer C quilt is once again on the back burner while I work on something for an upcoming show deadline. Growing up we did tons of hiking in "our" mountains, more commonly known as the Lincoln National Forest/White Mountain Wilderness. We hiked with our parents, we hiked with all our friends (hi Tristan! and Chloe! and Lori!), we hiked with the girl scouts, we hiked with the ski team, we hiked with the dogs. Later on, we hiked with our boyfriends, and our parents' friends, and our cousins.
Though there were lots of trails, my favorite has always been the six mile trek between Monjeau lookout and the ski area- Crest Trail #25. It was beautiful, and fairly flat, and had fabulous rocks for climbing, and picnicking. Up above the trailhead at Monjeau was the fire lookout tower to climb up, and the ladybug bush. I have more pictures from hikes on this trail than any other, including almost a whole roll of "picturesque" shots of the trail 25 sign I took with my very first camera when I was about 8 years old. Anyway, before I write a book of hiking stories (remember that one time when....), I should get back to the point, which is the new quilt.
Back last fall, when I was working on my small topography quilt, it was really designed to be a technical exercise to work out how to make larger pieces based on an actual topo map. After having figured out some things that absolutely did not work (stiff interfacing between the layers) and some things that did (using painted remay worked great), I decided to start a bigger piece, and what better subject than Crest trail.
I began by working from 1:24,000 USGS topo maps of the area. I struggled with how to do it for a while- my original plan was to just get out my old White Mountain Wilderness map and trace the topo lines, but this turned into a huge disaster. Come to find out, you can actually download USGS PDF maps that can be opened in illustrator and have editable layers. Once you get them open in illustrator, the files are huge and have thousands (no exaggeration) of layers, so getting to a usable file was fraught. Added to that was the fact that my area of interest crossed over two of the maps, and I had a fairly challenging data management problem to solve. Anyway, I finally got my map pared down in Illustrator to the region surrounding Monjeau and the base of the ski area, and established 160 foot topo lines. Each topo line would outline a layer to be cut out and built up to create a 3D quilt. For precision cutting of the layers, I use my silhouette, but it's limited to 12 x 24, so I split the map into three panels. The topo lines go from about 7,800 feet to almost 11,000, and the tallest points (Buck mountain) have 18 layers in them.
After finalizing my map, the next step was quilting the base. I used remay on the front (since I wanted to paint it later to match the layers) and regular cotton on the back. I decided the quilt the topo lines into the base to help line things up later, so I printed out a full size version of my map on newsprint and taped it down. After quilting, I tore off the newsprint, and what a mess that was.
The next step was cutting the layers, and there were three separate silhouette cuts for each layer (elevation). That is, there was the 8000 feet layer for the left panel, the right panel, and the middle panel. It resulted in millions of little pieces, and to keep them all straight I printed out a page for each elevation so I'd know what pieces were supposed to be there. I had to pull in every table around to have space to spread everything out, and for several days everyone was banned from the studio lest small weird pieces float away. I painted all the pieces with latex and acrylic paint then let them all dry. The video clips below just show my studio filled with all the little pieces for each layer spread out on every available surface before and after painting (the sound is Star Trek, I'm rewatching TOS and it's a blast).
Next week I'll share more about how I'm assembling the layers, but because these pictures have been pretty boring, here's a peek (peak? hahah bad puns for the win) of what all the layers look like just piled up (i.e. without spacers and not stitched down to anything).
I'm linking up with Nina-Marie as always, I hope you're having a productive and creative week!