Showing posts with label Orchard. Show all posts

Thursday, November 7, 2013

Last day to vote at Bloggers Quilt Festival

Hey everybody, just a quick reminder that today is the last day to vote in the fabulous Blogger's Quilt Festival.  There are tons of fabulous quilts in a bunch of different categories, and many thanks to Amy for organizing it all!

AmysCreativeSide

My quilt is in the Art Quilt category and has also been nominated for Viewer's Choice (I was so shocked and excited about that!!)


Friday, October 25, 2013

Bloggers Quilt Festival: Winter in Lincoln County #1

Welcome to everyone who is clicking through from the fabulous Bloggers Quilt Festival hosted by Amy over at Amy's Creative Side. If you haven't yet been over there, click through to check it out.  Its always a wonderful event.

AmysCreativeSide


 I hope if you like what you see you'll come back again sometime.  You can see some of my finished quilts in the top tab pages, or just browse through the archives to get a sense of what kind of things I make.

Apologies to my blog regulars who have seen this quilt before but this year I'm entering my quilt Winter in Lincoln County #1: The Orchard. It's inspired by a picture of my parent's fruit orchard in the mountains of southern New Mexico (I'm counting the days until I can visit again) which was taken after a winter snowstorm.  Winter is my favorite time of year, and I love the crystalline cold feeling on a fresh new morning.

Winter in Lincoln County #1: The Orchard, c. 2013 Shannon Conley
The sky is a piece of fabric I painted, cut up, and tiled after being super-inspired in a Gloria Loughman class.  The trees are made with all different techniques.  Some are commercial fabric, some are painted fabric, and some are thread painted on dissolvable stabilizer.  All are accented with free motion quilting.  My favorite parts are the shadows which I made by cutting stencils and daubing with many different colors of Shiva Paintsticks.


Winter in Lincoln County #1: The Orchard, detail

Winter in Lincoln County #1: The Orchard, detail

Winter in Lincoln County #1: The Orchard, detail

Thanks again for clicking through, and many thanks to Amy for such a fantastic job organizing the Blogger's Quilt Festival!  For more info on this quilt, you can click the "orchard" tag in my right sidebar.

Friday, August 16, 2013

Winter in Lincoln County #1, Finished!

I'm so excited to have a finish to share with everyone today!  I love the way this quilt turned out and I wish you could see it in person (for some reason the varying whites in the snow just don't come out well in pictures).

For those of you who haven't been following along, you can find out more about the whole process for this quilt by clicking the Orchard label in my sidebar.  This quilt was based on several pictures of my parent's mixed fruit orchard in Ruidoso Downs, NM, the home I wish I could get back to more often.

Enjoy and happy weekend!
Winter in Lincoln County #1: The Orchard, c. 2013 Shannon Conley

Winter in Lincoln County #1: The Orchard, detail

Winter in Lincoln County #1: The Orchard, detail


Winter in Lincoln County #1: The Orchard, detail

Winter in Lincoln County #1: The Orchard, label

Linking up with lots of wonderful places including Nina-Marie's fabulous art quilt linky Off the Wall Friday, TGIFF today over at Amy's Crafty Shenanigans, and Link a Finish Friday over at Richard and Tanya Quilts.

Wednesday, July 17, 2013

WIP Wednesday: Shadows on the Orchard

Since I finished the dog quilt (which did not, alas, get into the show I was rushing to finish it for), I've started designing another small art quilt for a SAQA New Mexico challenge.  But while I wait for some supplies to arrive for that, I've been spending some time working on the Orchard Quilt.  When last we saw it, I'd finished the quilting, and it only remained to put some shadows in on the trees.

I painted some shadows for the trees back at Asilomar when I first started the project, but later realized they went the wrong direction for the light source in the quilt.  I'm not a good drawer or painter, so decided to use Photoshop to get the shape and orientation of the shadows.  I took a picture of the quilt, resized so the picture dimensions matched the quilt dimensions and then created new layers containing each tree.  I was then able to transform the layers so they were the correct angle/direction/perspective for my light source.  I then printed out each of the layers and traced the outline onto freezer paper.  After carefully cutting out the tree outline with an exacto knife, I was able to iron the freezer paper stencil to the quilt surface.

I decided to use Shiva Paintstiks to fill in the stencil.  I did a practice tree first on a piece of scrap fabric and decided that a light mix of silver, blue, and purple with a tiny bit of black gave a good color.  I love the translucence and iridescence of the painstiks, not nearly as heavy as liquid paint.  I liked this approach for shadows and think I'll use it in future.  I actually think it might be fun to do some "shadow study" pieces;  the shadow on that big foreground tree was really cool and it made me sad that the vast majority of it went off the front of the quilt.


That tree on the left was supposed to look like it was on a snowbank (cream) behind the front tree (white), so I cut the shadow stencil apart and offset/shortened it since I felt like some of the shadow would be behind the hill where you wouldn't see it.  This is just about the last step on this quilt, I'm going to give the paintsticks a couple of days to set up and then iron them before I wet and block the whole thing in anticipation for facing/finishing.

Linking up as ever with Lee and Nina-Marie!  Hope you are all having a creative week!

Tuesday, April 16, 2013

The trees!

Morning everybody! Anyone out there going to the SAQA conference next weekend in Santa Fe?  I'm looking forward to it (yay), should be great.

I'm working on the arrangement of the trees in my orchard quilt and could use some input.  I have a total of seven trees, three were painted and cut out, three were thread painted on dissolvable stabilizer, and one was assembled out of fabric.  I'm not sold on using all of them necessarily, but I like the different textures the different types of trees bring (hard to see in these pictures).  So far they're all just set out on the background, but once I settle on an arrangement I'll quilt them down and add a bunch more small branches.  Take a look and tell me which placement you like best or if you have suggestions for other arrangements.  One of the challenges has been that in my original picture not all the trees are the same size; that is, there were baby trees and large trees.  But whenever I put the baby tree next to the large tree, it just looks like I've got the perspective wrong (i.e. that it's a farther away tree in the wrong spot) rather than like a baby tree.  

Number 1


 Number 2


 Number 3-4  (the same except with the baby tree added to the far right on #4)


 Number 5


 Number 6, 7, 8 (these are all similar except for the placement of the baby tree).


Any thoughts readers?

Tuesday, April 2, 2013

April Goal Setting: Orchard Quilt

The dreaded March is over (I hope everyone had a glorious Easter), and I still feel bewildered and not-in-my-groove blog wise.  I've been doing quite a bit of quilting, but not as much writing about it.  Last week, I wrote a WIP: Wednesday post and forgot to link it up.  Over the weekend, I was going to write a follow-up post for my March "A Lovely Year of Finishes" and couldn't remember what my March goals had been.  When I went back to check on the blog I realized I'd never gotten around to setting goals for March (no wonder I couldn't remember what they were).  And then Monday morning, I remembered that it was the deadline for the artist contract and catalog photos for the Text Messages show, but couldn't find the contract anywhere.  After sending a panicked e-mail to the very nice curator about it, she re-sent the contract and I realized it had been attached to the original e-mail (which was still in my inbox) the whole time and that I was just an idiot.  So, definitely not-in-my-groove.

In an attempt to rectify this, I hereby set the following April goal for A Lovely Year of Finishes:

Finish the orchard quilt.

Over the last couple of weeks I finished quilting my Sierra Blanca mountain quilt (hopefully a post on that will be coming), and over the weekend started working on the orchard quilt as well as a warm sort-of-whole-cloth thing that I'll also share sometime soon.

You may remember when last we saw it the orchard was just some disparate painted trees and background. After some consultation with my mom, I planned the composition and over the weekend pieced together the foreground.  I also tiled the background; this is a technique we learned in Gloria Loughman's class that I'd wanted to try.  The sky was cut up from the piece of fabric I painted in the class and I laid out the pieces in a tumbling block/star pattern.  For now they're just fused, but will be sewn down during quilting.


Up next, the trees!

I'm going to link up with Fiber of All Sorts of course, but also with the lovely Lee over at WIP: Wednesday (if I remember this time-sigh).  Happy quilting to all!

Friday, March 22, 2013

The Orchard

I mentioned earlier that I decided not to put any insets into my Sierra Blanca mountain quilt and instead decided to incorporate them into a new quilt.  You may remember my orchard inspiration picture, this is at my parent's, they have apple and cherry and peach trees (these are apple I think).  I wanted to have a blue sky though instead of grey since that's one of the characteristics of New Mexico winters- once the snow goes, the crisp blue sky comes back (as in the next one of my bldg a snowman about 8 or 9 years ago).


Anyway, while I was still at the seminar, I painted some sky pieces to put behind my trees using the Australian equivalent of cetacolor transparent fabric paints.  I also decided to paint the three apple trees and apple tree shadows I'd decided to put in the quilt.  For the sky, I painted the fabric wet to give a blendy look.  However, for the shadows and trees I painted the fabric dry. At Gloria's suggestion, for the trees I sketched my tree outline in ballpoint pen (with the intention of cutting the line off later) and then painted it in.  While painting the brown in, I made an effort to leave half of each branch white to give the appearance of snow.  I think my trees turned out very nice, but painting them was fairly painstaking.  I am not a painter, so even though this type of painting doesn't require any drawing ability, it was still outside my comfort zone.

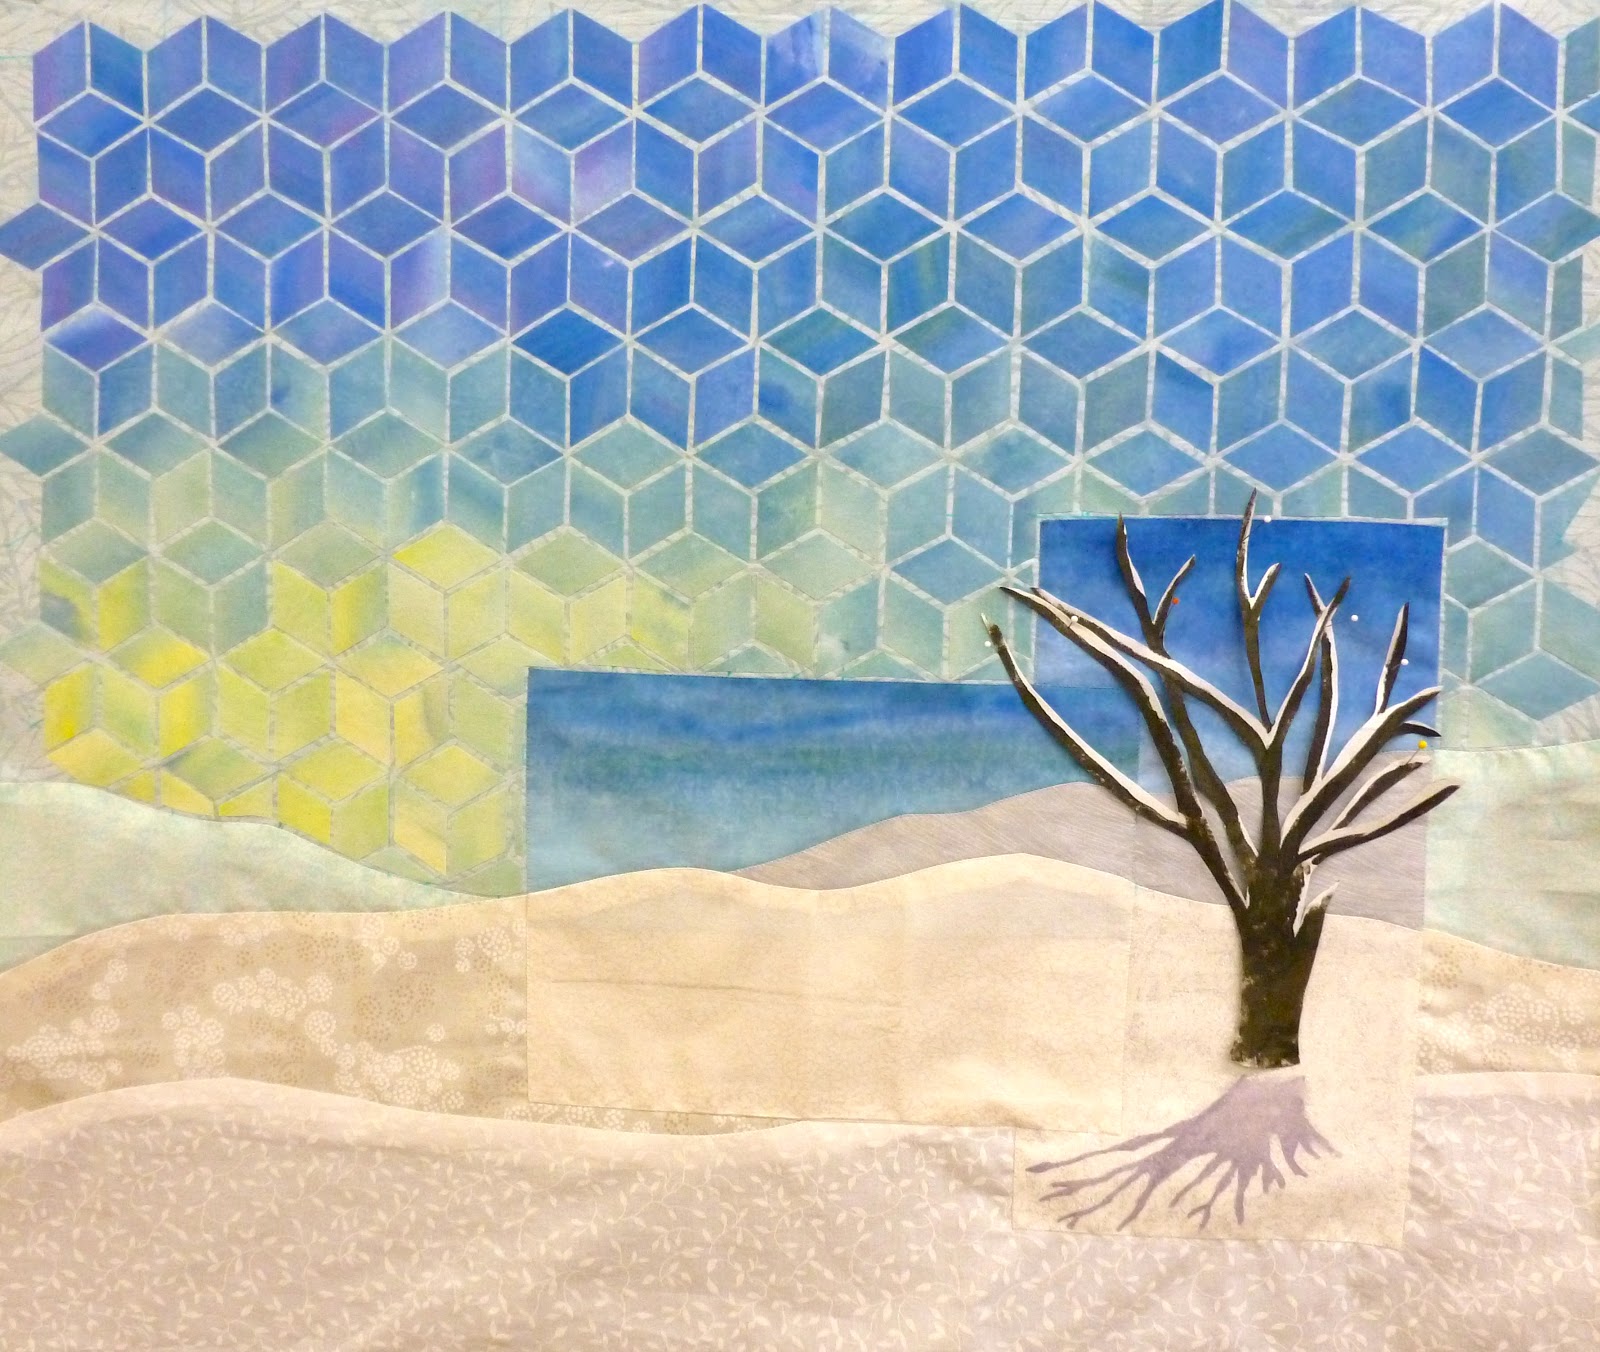
After all my pieces dried, I assembled my sky and foreground in preparation for adding the trees.  This whole piece will be machine appliqued onto another snowy landscape background.  So far the trees are just pinned up, and the left ones don't have their shadows, but this is more or less what they'll look like.  I may decide to thread paint some more trees in the background,  I'm not sure yet.


For the sky of my larger snowy landscape background, I decided to use one of the techniques Gloria taught in the class that I didn't use in the mountain quilt: tiling.  You can see it in the background of her Fern Pool and Wind Power quilts here.  Although you can do this with any type of fabric, I didn't have any that I thought worked, so I decided to paint another piece of fabric to cut up for my tiles.  Here it is.


And this is as far as I've gotten!  My next step is cutting the fabric up to use for tiles- you can make them any shape; squares, rectangles, and diamonds were all popular.  One of the students from a previous year brought her quilt in for show and tell and she'd arranged her diamond tiles in a tumbling block pattern so I decided I'd try that.  We'll see!  I'm linking up with the lovely Nina-Marie as always!