Showing posts with label Embroidery. Show all posts

Monday, May 16, 2022

Embroidered Doll Ornaments


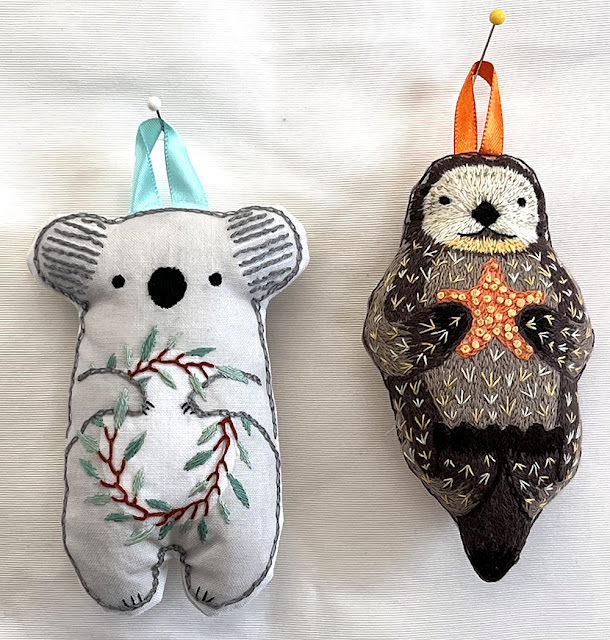
Hi everybody, I just wanted to jump in today and share about some hand embroidered doll ornaments I just finished up.  These were kits for embroidered dolls put out by kiriki press, and they are all adorable.  I don't usually buy kits, but one of these was a present a friend gave and one was one my mom bought for Anna to make, but she wasn't interested.  If she gets more into hand sewing later, I'll definitely get her another one.

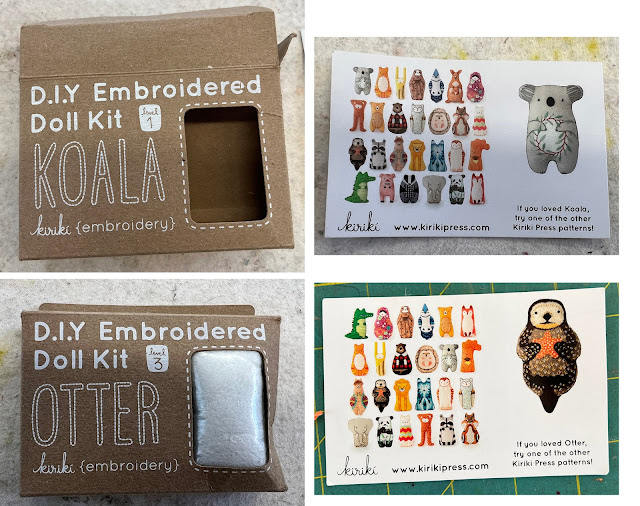
The kits are great, all adorable little animals, and the kit includes everything you need to make the doll except a needle, scissors, and embroidery hoop.  In addition to the materials, each kit also includes an instruction sheet and little colored card with photographs of the finished doll.

The instructions don't have directions for the individual stitches, so if you're new to embroidery, you'd need to go online and find instructions.  However, the kiriki website has a good downloadable stitch dictionary and of course there are many online.  The kits are staged by level based on the amount of the doll covered in stitches and I happened to have a level 1 and level 3 kit.


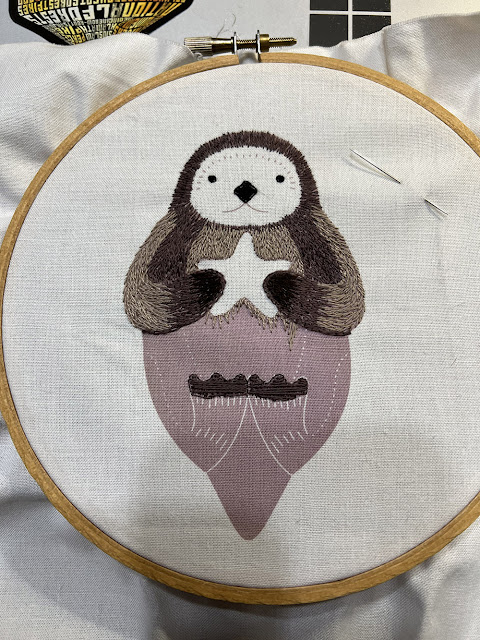
The dolls finish at about 4.5" high, and I like that the shape to embroider is printed on a fairly large piece of fabric so it fits well in a 6" embroidery hoop.  I hate when the fabric is too small and you have to stitch on extra bits to fit it in the hoop.

Here you can see the otter in-progress.


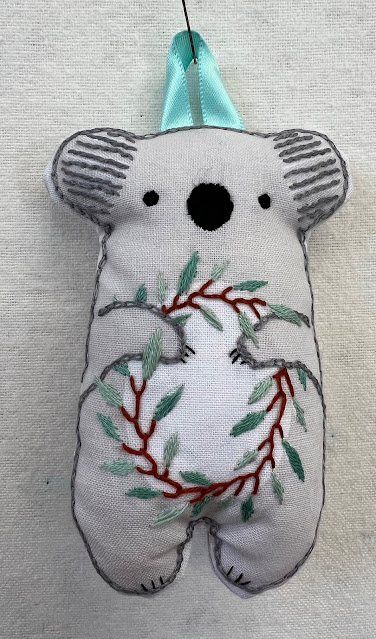
Here's the finished koala. You can see he isn't too covered in stitching, and he stitched up pretty fast.  They are meant to finish up as stuffed dolls, but I don't really need any dolls so I added a little hanging ribbon so I can use him as a Christmas ornament.


The backs are just plain, but I decided to stitch the year since I like to have that on my ornaments.


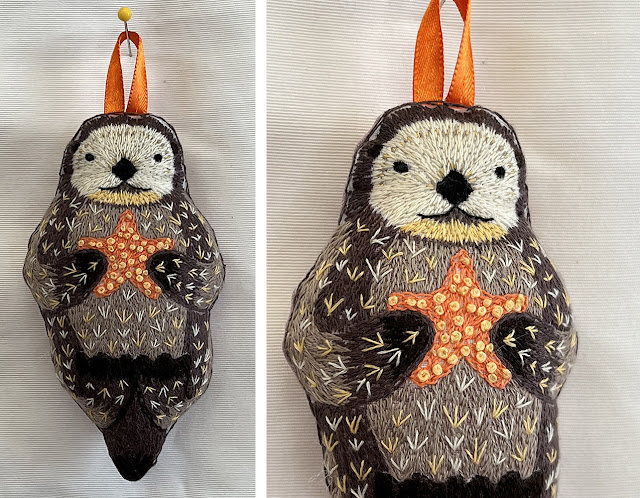
And here's the otter.  You can se he's entirely covered in stitching, so of course he took a bit longer, but even so it wasn't difficult.  None of the stitches were particularly complicated and the instructions were clear.  I'm not that great about sewing smooth curves (during assembly) but that's just me.


These were fun to work on, a good evening project while watching TV.  I am glad to have made them and not have unused kits for things in my studio!


Monday, April 18, 2022

Embroidered Pincushion

 I really enjoy hand embroidery, but I don't particularly like doing big embroidery projects; I tend to save my "big project energy" for art quilts.  But I love having a small embroidery project going at any given time, and one of my favorite embroidery blogs is run by Mary Corbett over at Needle N Thread.  She's been running a series of small stitch-along projects.  They're great because she walks through each step, and then the project finishes into something useful.  

Recently she led a stitch-along to make a bejeweled beaded pincushion.  You can see all the posts about the project here.  Mary sold kits for the project but I wanted to use things I had on hand so I sort of adapted it a little for my materials.

The main embroidery is on the side panel that wraps around the pincushion with a little additional fun hexagonal stitching along the top.  I had to put it in a fairly large hoop because the part that wraps around the pincushion is pretty wide and because it's beaded you can't really move the hoop.  Someday maybe I'll invest in a nice rectangular frame, but not just now.


I love Mary's stitch tutorials, she provides so many details so it's easy to learn how to do the stitches properly.  I don't always manage it, but it's not for lack of instruction.   

After stitching all the stems, I stitched a few thread flowers and then started stitching the beads.  I haven't done much beading before so that was one of the things I liked about this project. I had wanted to use all supplies I had on hand, but the project called for tiny 11/0 seed beads.  I have a variety of 15/0 seed beads, but they really looked too big on here.  I found a great local bead store and picked up a couple of different shades of blue and pink beads.


After assembling the pincushion, there is a row of palestrina stitch around the top and bottom edge.  That was a new stitch to me and it was wonderful to have instructions for both left and right handed stitchers.  The palestrina stitch was fun and it was good to have a chance to practice it. 


I love the way it turned out.  I took it slowly, stitching on it a little here and there when I had time, and it was fun to have it finish into something I think is so pretty at the end.  I assembled it a little differently than in the instructions because I wanted to stuff it with walnut shell crumbles.  It has a piece of matboard inside the base which makes it nice and sturdy feeling.


It feels a little old-fashioned in a delightful way.  It was a great low-stress enjoyable project.  If you like embroidery, I recommend you follow Needle N Thread.


Monday, March 22, 2021

Winter Embroidery Samplers

 One of my favorite embroidery blogs is Carina's Craft Blog.  I love her brightly colored flair and her fun patterns and writing style.  I've stitched her patterns before, most notably this tree pattern and a lovely fall wreath.


Earlier this year when it was still very much winter I started working on her Stay Home and Stitch pattern.  I committed to using all my pearl cotton and other heavier threads.  In retrospect I think they were a bit heavy for some of the letter fills, but I had a good time using different fill stitches.


I love the bright yellow leaves, the purple sparkly needle, and the orange and gold scissors.


Right after starting the Stay Home and Stitch hoop, Carina did a tutorial post on the Swedish embroidery style called Bottensöm.  I loved the look of it, and decided I had to try it at once.  I pulled out another hoop and a piece of the same scrap fabric as I'd used for the piece above and started stitching.  I had so much fun usin gthis stitching approach I've recently finished a whole art quilt using it.  Hopefully sometime I'll get caught up blogging about it too.


After finishing these, I had two ~6" diameter embroideries but no need for any more wall hoops.  I decided to finish them into a project bag with some colorful patchwork stitched up from my scrap bin.  The bag is really lightweight, no interfacing, no complicated pockets, just a nice project bag that closes with a zipper.  It's about 12x12 and is nice and capacious.  I look forward to carrying around future embroidery projects in it!


The inside is just more scrappy fabric from my leftovers.


I love hand embroidery- it's a great complement to knitting in my handwork arsenal, and it was fun to finish these up into something useful.


Monday, July 20, 2020

Embroidered Prayer Book Cover


A couple of years ago I decided my prayer book hymnal really needed a cover.  It's my every Sunday prayer book with all our services and hymns so it gets quite a bit of use.  And it's always been a bit fragile ever since Bullett ate it when he was a puppy.  A bookbinder friend repaired it for me but there was nothing to be done about the missing pieces of binding.  Anyway, I decided to do an embroidered cover for it.  The background fabric is a navy blue satin weave fabric that has a nice subtly turquoise iridescence in person. 

I was inspired by the voided monograms over on Needle n Thread (my favorite embroidery blog).  I marked out some faint outlines and started stitching!   It's all worked in standard cotton embroidery floss, mostly with two strands at a time.  


I hadn't really been working on it for several months, but during the stay-at-home orders this spring, I worked on it through many many zoom meetings, so I was able to make lots of progress.


The embroidery wraps around the back, mostly flowers and vines and leaves, but a there are a few small butterflies and dragon flies, as well as a slightly larger bird and mouse.


This is the completed embroidery.  The words around the edge come from one of our Eucharistic prayers and are meaningful to me.


Here's a close up of the bird.  He's pretty small, about 2.25" long.  My shading could use some improvement, but I think he came out cute!


The mouse is about the same size.  I was using all stash thread, so didn't have quite as many colors for the shading as I'd have liked but cute all the same!


And here it is turned into the book cover.  The Chi Rho isn't quite centered on the front, I actually think that element was a bit too big overall, but otherwise I'm really pleased with how it turned out.  Of course, now I have an embroidered prayer book cover with many many many hours of embroidery-  in retrospect probably not the best choice for such an oft used book that goes in and out of my choir bag with such regularity, but it makes me happy to have something so pretty to cover such an important book.


Friday, October 6, 2017

Goldwork Fox

A couple years ago I started reading Mary Corbet's Needle N Thread, which is the best embroidery blog I've ever found.  She works on great projects so there's lots of eye candy, has lots of great educational content about working on projects, the mechanics of stitching, how to approach planning and design, and everything else you might need for embroidery.  She also has some historical content as well, and its fun to learn a little about past embroidery.

In any case, while reading her blog I learned a little about goldwork, which I had previously seen but never knew anything about.  It's an embroidery technique where you use thread or floss to attach actual metallic bits to the surface of the embroidery.  As it turns out there are a lot of different goldwork techniques, but in general think of the sparkly bits on military uniforms or ecclesiastical vestments.   I thought it might be fun to try, but I wasn't super excited about buying a whole bunch of new stuff until I knew whether I'd like it or not, so when she did a giveaway for one of Becky Hogg's fabulous goldwork embroidery kits, I entered enthusiastically.  I didn't win the giveaway, but I asked for the goldwork fox kit as a Christmas present that year, and Mike got it for me.  

I don't ever make things from kits- mostly I have such strange ideas I'm pursuing that it wouldn't make sense, but you guys this kit was amazing.  It was beautifully put together, there was plenty of all the materials, the instructions were very clear and thorough, and it was a great way to try a bunch of different new techniques.  If you're at all interested in trying out goldwork, I'd strongly recommend one of Becky's kits.  

Anyway, I didn't have much time to work on the fox until the last six months or so, but recently I've been taking it to knit night and working on it there.  And then last weekend I got to work on it during a softball game for Mike's granddaughter and an OU football game, so it got finished!  It came with a cute hoop to finish it in (to hang on the wall), but I decided to turn it into a brooch instead.

The first step was to stitch down felt support padding, and then the first actual goldwork technique was couching down thin gold wire.  You can see all the loose ends in the second picture that had to be buried.  That was very tedious, as I'm sure you can imagine.


The next several techniques were less tedious, but I forgot to take step by step pictures.  All the rest of the techniques utilized different colors and sizes and textures of fine metallic springs.  These were either put on by couching over them and pulling the thread down between the coils of the spring so you can't see the thread (as in the outline of the face and tail), or by cutting pieces off the spring and sewing the thread through the center of it like a bead (as on the tail and ear fill).  These steps were easier than couching the wire, but it was difficult to get the rose gold springs cut the right length for filling the tail.  They were more uneven than I'd have liked, but I got better as I went along!  


To finish him after all the embroidery was done, I hand stitched the edge of the white fabric around then backed it with felt and sewed on a brooch pin. He's so very sparkly and shiny and reflective, it's so hard to get a good picture, but I really love the way he came out!!


I had such fun working on this, it was really very very slow work, but I love the effect, and may use some of these goldwork techniques in a future embroidery project.

Have you learned any new techniques lately?

Linking up with Nina-Marie!


Thursday, October 5, 2017

I Like #37

It's been a strange week here, I've been feeling under the weather, and anxious and worried, but digging deep there are still some good things!

1.  I like being back at choir rehearsal.  I'm sad that sailing season is over but I am glad to be back at choir rehearsal.  I've been singing on Sunday mornings the last few weeks but kept feeling behind since I missed rehearsal.  Our church is under construction and our choir room flooded last year, so we're in a state of upheaval.  To compensate for the fact that a lot of the music was damaged and/or is currently inaccessible, we got new a new book of choir anthems we're singing out of this fall.  In typical fashion my first instinct is to not like them (because they're not my old favorites), and then after learning them realize how fun it is to learn new things and how nice they are.  Yes, I roll my eyes at myself.  After accidentally picking up someone else's book several times I decided to make a cover for mine which I was going to share today but I seem to have lost the pictures.  I'll have to take some more.

2. I like embroidery.  Lately I find that I have lots of quilt deadlines and they're causing me some anxiety which unfortunately translates to lack of enthusiasm/motivation, and I've been finding that what I enjoy most is my embroidery.  I finished my goldwork fox (I turned him into a brooch) and will have a full post up about him tomorrow, but here's a sneak peek.  My next project is an embroidered prayer book cover and I got that designed.  It'll be a very-long term project, but I'll share progress along the way.


3.  I like crocheting new things.  I haven't been doing much crochet work, as my time at knit night has been spent doing embroidery, but our knitting group decided we'd make booties for new babies in the parish, so I whipped up these.  The baby they're for is already three months old, but even so I think they're way too big, but they turned out cute anyway.  As usual, I struggle with things that need to be a certain size, but I'll get better!


3. I like the ceramics of Jennifer McCurdy.  Her work is absolutely gorgeous, and she captures in porcelain the airiness and grace I'm striving for (but not usually attaining) in my openwork quilts.

Thanks to Lee Anna as always for being such a great friend and motivator!

Monday, May 16, 2016

Craft is Art

A while back Urban Threads (my favorite source for fabulous machine embroidery designs) capitalized on the current trend of adult coloring books by issuing a coloring contest for one of their embroideries.  They released the Craft is Art pattern free and challenged people to stitch it up and color it in.

The contest call came right as I was about to start painting in the quilting on my large illuminated manuscript quilt, and give the weird fabric that quilt is made out of, I had planned to do some paint/ink/marker tests before nearing my quilt. It seemed like this was the perfect opportunity, so I made a quilt sandwich out of the same fabric as my quilt top, stitched out the design and started coloring in.

I'm so glad I did because the surface of this fabric is really weird-  it's a think polyester fabric with a suede like finish, and come to find out, many of the things I was considering using on the quilt bled outside the lines.  The bleeding was so bad that I wound up adding more color outside the lines on purpose to give a sort of watercolor-wash effect.

Things I tried that did not stay inside their lines-  cheap acrylic paint cut with water, good acrylic fabric paint cut with water (like setacolor), fabrico markers (so sad about this), inktense pencils (likewise sad about this), sharpie, latex paint cut with water.  I usually really like diluting my paint a little with water just to make it easier to get down in crevices around the quilting, but I really found that I had to use the paints completely undiluted  if I wanted them to stay put on this particular fabric.  I also used some oil based enamel since it gives better metallic, and the color on it stays put fairly well, but occasionally the solvent separates and bleeds out giving a weird halo sort of effect.


It was pretty fun to color in though, and after coloring it, I quilted the background with multiple colors of silk thread using motifs to echo the embroidery pattern and bound it using organza.  From a practical standpoint, organza is a pretty dumb thing to bind with (hard to iron, very ravely, doesn't crease well), but I really wanted a light, glowy edge and I think this accomplished it.

So now I have a new little mini to hang on my wall!


Have you guys ever painted/colored in embroidery or quilting?  If so, what media did you use? I find it fairly tedious, but have used it now a couple of times, including in my Gloria Patri quilt.


Monday, May 2, 2016

Embroidery Swap

I signed up for an instagram swap called #Bigstitchswap2 being hosted by the lovely Sarah and Cindy of FairyFace Designs and Fluffy Sheep Quilting, respectively.  I've had an instagram account for a while, but I never posted anything, so this was a fun chance to get to use it more.

The swap was for a small piece featuring some amount of hand stitching.  Some people were making pouches, or mini-quilts, or journal covers, etc.  I decided to do a clock, and because I've been on a hand embroidery kick lately, I decided to do some more of that.  Recently, Mary Corbet (of Needle'N Thread) had a sale on her fabulous PDF embroidery books and I picked up her monogram alphabet book.  It's really fabulous, it has great stitch pictures and descriptions as well as instructions for making the letters and suggestions for switching up stitches.  If you're at all interested in embroidery, her website is great.

Anyway, using it as a guide, I stitched up the following for my partner.  I started on the J, then decided it needed a bird, so I stitched that in.  Don't worry about the blue marker in the bird closeup, it's that water-erasable marker and is gone now.  Afterward I pieced the letter into a background, embroidered a clock face and some accent stems, and wrapped the whole thing around a set of 8x10 canvas-covered stretcher bars.  The last step was putting the clockwork in.


I had a fun time working on this, and hope my partner enjoys it!

Monday, March 7, 2016

Hand Embroidery

Recently our church vestry went on a retreat held at our diocesan summer camp (St. Crispins for any Oklahomans) and the beautiful setting and relaxing environment made me return home in the mood for some hand embroidery.  We closed by singing this Sam Baker song-  it's a lovely way to wrap up, and I love the echos to Come thou fount, one of my favorite traditional hymns.

Anyway, I decided to do a piece of hand embroidery referencing that text and turn it into a cover for my three ring binder full of vestry paperwork.  I sketched it out ahead of time, and then just stitched away.  My stitches aren't very even- clearly I need work on my satin stitch, but overall I'm pleased with how it came out.  By the time I got to the words I was done hand stitching, so I decided to do those free-motion on my sewing machine.


I made the binder cover so that one inside flap has an integrated pencil case and the other size has a pocket to hold a notepad.  I always have a good time figuring out how to assemble things like that.


And on another hand stitching note-  I hand stitched my valentines this year!  Well- not really stitching, more like card-threading, but it was fun all the same.  I've always loved string art, so much so that I did a quilt using it a few years back, so I decided to take a simplified approach to it for my valentines.  It's just perle cotton on cardstock.


I was also inspired by some beautiful online calligraphy (I'm terribly ashamed that I can't remember where I saw it) to try some fun envelopes.


Although at the moment I've gone back to working on the quilting on my big two panel quilt, there's more embroidery/hand stitching in my future as I've signed up for the big stitch swap being hosted by Fairy Face Designs.  This is my first instagram swap, so it's a new approach for me!