Showing posts with label Projects. Show all posts

Monday, October 7, 2013

Church Altar Cloths

Back before Easter (ouch!) a kind lady named Gerry at our church asked me if I'd be willing to make some table runners for each of the church seasons for the conference table in our church office.  She also wanted an altar cloth for one of the chapels.  I agreed, but it wasn't until August that we actually got together to do the project.  She picked out and paid for the fabric and I stitched them up!  I decided to go ahead and use my embroidery machine to put some embroideries on them to add a little interest.  I'm always surprised by how long even a fairly simple seeming stitch-out takes.  These took about 45 minutes each, so with thirteen of them to do (two each on the table runners and one on the altar cloth) it was a lot of time babysitting the embroidery machine! The fabric was all really slippery, but I think they turned out nicely.

This first one is on my design wall folded in half.  They were pretty long, about 84" I think.


And here's Gerry in the church office with the one for ordinary time.


There are two more, a red one and a purple one, but I didn't get very good pictures of them.  And these next pictures are of the altar cloth.  It's a bit wider and shorter and since it has a definite front, I used a different cross embroidery.


Friday, October 12, 2012

National Parks

I don't really have a bucket list, but one of my life goals is to visit all of the National Parks in the US.  We visited a bunch of them as a kid, and as an adult I've traveled to many more with friends, family and Mike.  I have the fun National Park Passport book to track the parks you visit, but the other day when I saw this National Park Checklist print on etsy, I fell in love with it too!

Sweet Mike ordered it for me as a present and when it came I couldn't wait to get it hung up.  It comes with little tree stickers you put on when you've visited each park; they're very cute.  It's 11 x 17 which is a standard size paper, but apparently not a standard size frame.  When I checked at hobby lobby, just the frame itself (no glass, backing, or framing) was going to cost over $50.  Eek!  I decided I'd try my hand a making a frame-like-thing, so I bought this piece of pretty trim from Home Depot for $16 and went to town.

Mike actually cut it out for me using a miter box and I just assembled the four sides using wood glue and a staple gun.  I decided to piece a fabric background on which to float the print (kind of like a mat, and decided to just sew down the print itself rather than trying to deal with glue and the potential for it to fall off or peel at the corners.  Such a fun alternative to traditional framing!


After finishing it, I put on the tree stickers for the parks I've visited; they're the colors of the words "national parks" at the top of my print, so look fun and bright on the print.  In spite of my best efforts, I've only been to about a third of them.  I see lots of camping trips in our future!

Friday, September 28, 2012

Fall Trees

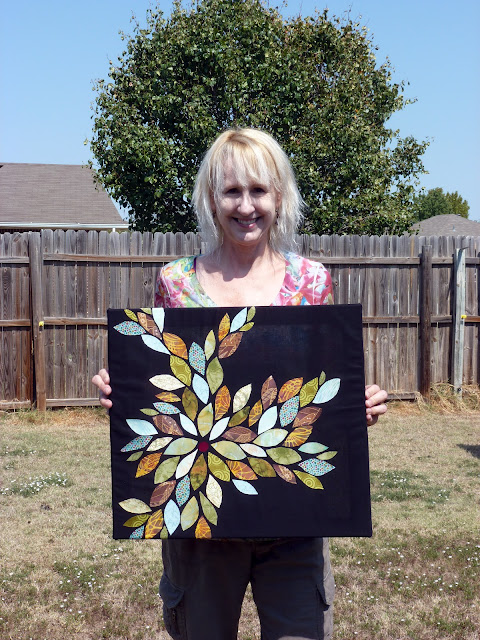
Last year I pinned this fabulous picture and never got around to making anything inspired by it.  Then recently I found this, and really liked the idea of doing something canvassy rather than quilty.  When my minimal-sewing friend Linda and I decided to do a craft morning, I thought this might make a fun project.  We did kind of a hybrid of the two; the leaves are all fusible-backed and fused onto fabric.  After fusing, we mounted them on stretcher bars to make fun fall-inspired wall art.  It was such a stress relieving project, no worries about sewing or puckers or perfection; just pulling fun, inspiring colors and fabrics.

Here's the one Linda made, with mine underneath it.  We were both thrilled with how they turned out!


It makes a super fun addition to my fall decorations which I just put up last weekend.  Have you guys been doing any fall decorating/crafting lately?

Tuesday, September 4, 2012

Cyanotypes!

My family was here visiting over the long weekend; my mom was here specifically to do Arts Festival Oklahoma.  It was really really hot (still above 100), but we were glad to see everyone anyway.  Of course even though she was here for business we had to do a fun project together and sun printing was the order of the day.

My mom bought some photographer's formulary sun printing (cyanotype) mix stuff that was supposed to be easy to use.  Of course, unlike the easy kits of the "mix solution A with solution B" type, this one came as a bunch of different powders and vials that had to be ground up, heated, stirred, mixed, cooled, filtered etc., all in low light.  I borrowed beakers, a graduated cylinder, a hot plate, stir bar, thermometer, and mortar and pestle from the lab and the first night we followed the fairly involved instructions to make up the solutions.

The next day we painted the solution onto the PFD fabric in low light and let it dry.  You can sunprint with whatever opaque objects you want (leaves, botanicals, etc.), but we decided to use photograph negatives printed onto transparencies.  My mom had a picture of the historic Old Mill she printed.   It's the oldest building in Ruidoso (built in 1868) and something of a local landmark.  I forgot to take a picture of it before she took it home, unfortunate since it turned out the best of all of them.

The process is theoretically fairly easy, you take the fabric, cover it with the negative or item to print, and put it in the sun.  After letting it expose, you rinse it in water and hydrogen peroxide.  In spite of trying many many different things, I'm not sure we ever got the right balance of chemical concentration, exposure time, and rinse time to really make perfect images, but it was fun anyway.

Here are the negatives taped over the fabric, ignore the picture in the frame underneath, it was just something to tape it all down to.  The next picture shows a couple of my prints rinsing in the sink afterwards.


I chose four different sea-related photographs to make my prints and negatives.  All of them except the jellyfish were taken by my father on our trip to California a couple of years ago.  I took the jellyfish picture.  

On the top left is the original image (in this case a seagull), on the top right is the black and white negative of the image which I printed on the transparency, and on the bottom are two sun prints I made from the negative.  The one on the left is a bit over exposed but is probably one of the better ones I did.  The one on the right is ok, but something splashed all over it before it was dry so it has funny spots.


For the anemone, I made one fabric print from the negative transparency (yielding a positive print) but the anemone looked too washed out.  As a result I printed a transparency with the positive of the image and made two fabric prints from that (seen on the bottom), and I think they turned out better.  


I made two prints from the jellyfish as well (bottom row), and I like the dark blue color better than the more washed out looking one, but it's really hard to see the third jellyfish on the darker print.


The fourth picture I picked was this photo of a seal; unfortunately it didn't really have enough contrast to make a very good print.  I tried two.  The left one was ok, but not great, while the right one was so overexposed you can't even tell it's the seal!


This was a really fun project to play around with.  I'm excited to make some sort of mini-quilt with all of these blocks (each of them is about 6 inches square).  I'd definitely recommend getting the easy mix solution instead of the complicated stuff like we did though.  It's always such fun to try a new surface design/dyeing/printing technique!  

You guys do anything fun over the Labor Day holiday?  Try any fun new fabric techniques?


Monday, July 9, 2012

Passport Wallet

I'm leaving for Germany on Thursday, (yay!) and decided I wanted a passport wallet thingy to carry while I'm there.  I'd thought about just making up a pattern myself like I did for the iPad case, but then figured there were bound to be instructions already out there.   Of course, pinterest didn't let me down, and I decided to follow this fabulous tutorial from Crafty Staci.  The instructions were a little tricky, but I figured it out and am really pleased with how mine came out.  It was a first time I'd done a zipper like that and it was so easy (thanks to the instructions).

For anyone wondering, I followed her instructions exactly except I added piping around the outside and used snaps instead of an elastic.  The outer fabric is from my favorite print (from Jane Sassaman's Prairie Gothic line) and the change purse lining/piping are Kate Spain (both previously seen here).  I'm not sure what the inner pockets are.  It's kind of hard to tell in the pictures, but there are credit card/ID pockets on both sides (on top of the passport pocket), so I'm hoping to avoid carrying an additional wallet all together.


I hope the dogs behave for Mike while I'm gone!  Any last minute suggestions on things to do in Munich?

I'm actually going to link up with Young House Love/Bower Power/Centsational Girl/Ten June summer Pinterest challenge since it was running right when I decided to do this pinterest inspired challenge.  YHL is one of my favorite blogs, you guys should check it out.  

Monday, May 21, 2012

Super Secret Embroidery Come to Light

Way back in my New Year post for 2012 I mentioned a super secret embroidery project.  Well, the time has finally come to reveal it.  I really liked LuloBird's fabulous pillows, seriously you guys should check out her etsy shop.  Her embroidery is so much nicer than mine.  Anyway, I decided to make some state embroideries inspired by hers.  I made one New Mexico for my dad's birthday which was yesterday, so I thought I'd finally show them on here.  

I made the other New Mexico for me and then made two Oklahomas one for me and one for Mike's daughter Michelle who had to move to Wyoming with her family.  I thought she'd like having a little something to remind her of home.  

These were my first project to use perl cotton, it was easy to use, and I was glad to finally have some project for it.  I picked out a few skeins in Eureka Springs last fall, but hadn't made anything with it yet.  Hope you guys enjoy!


Monday, May 14, 2012

Mother's Day Flowers

I spent the weekend in Dallas with my sister, her husband, and my darling niece Anna-Banana.  She is absolutely adorable and getting sturdier by the second.  Becky says I'm still not allowed to throw her into the air, but soon I will!  Just a month has made so much difference in how alert and responsive she is.

My mom and I are going to MQS later this week, so we'll get to spend some quality time together, but I thought I'd quickly show the small crafty goodness I made for Becky for her first Mother's Day.

I saw these fun paper hearts and I thought they'd look great in a "bouquet" of sorts so I made some up out of fun scrapbooking paper and glued them to shish kebab skewers I'd painted green.  I made a few leaves as well, and then stuck all of them into a styrofoam ball inside a decorated can so that the arrangement would hold its shape. I stuffed some green felt in the top to look like grass and I think the whole thing came out cute. I figured she could use the can as a pencil cup later on if she gets tired of the flower arrangement.

I know you were all expecting a picture of the whole thing, but because I'm an idiot, I apparently forgot to take a picture of it before giving it to Becky.  So here are the hearts, and probably you can all imagine how cute they would look nicely arranged with leaves etc.  This is just the latest in my ongoing series of brain farts.  In a similar vein, I actually did find my missing SD card this morning; it was in the SD slot of my laptop (where it was supposed to be) the whole time.  Yes, total Shannon fail.


Anyhow, I sewed across the top and bottom of the hearts, but you could probably glue them just as easily.  I used four lengths of strips for each one, 12", 9.5", 7", and 5.5" plus one short piece to hold the middle together.  The middle piece can be whatever length you want to give more or less curvature to the heart, although it should be less than half the length of the shortest strip or else it won't make a heart shape.  My strips were ~3/4" and ~1 1/2" in width, but you can really do whatever width suits you.

I think these would make lots of other fun shapes, and would make especially fun magic wands, should any of those be needed in your household.  Hope you guys had a good weekend and a fun Mother's Day!


Friday, May 4, 2012

We're Not in Kansas Anymore

Hello blogland,  feels like I've been absent for a bit.  Sadly, I'll be out next week too.  I'm leaving tomorrow for my annual trip to ARVO, the national vision research conference (check out the abstracts if you're at all interested in vision research).  I'm excited to see some good friends and hopefully get some of my wayward science mojo back.

I have been crafting and sewing and working on Seymour, but I haven't made any really remarkable progress lately.  In addition, terribleness of terribleness, I lost the SD card from my camera.  It had a bunch of pictures of projects I was going to blog about so I'm pretty irritated.  Mike lent me his, but now I'm afraid to remove it from the camera.  I know the darn thing has to be somewhere in the house or studio, but we've searched and searched to no avail.  For today, iphone pictures will have to be enough.

Seems like I've been making lots of little presents for people lately, some I can't share yet, but a couple are for non blog readers so I can go ahead and show them.  I made this cute super-scrubby dishcloth for my grandma (if you have to wash dishes, might as well have a cute dishcloth).  The block is adapted from the Granny Square Book (such fun) which my mom gave me for Christmas.


Last night I also whipped up a small pouch for my cousin who is graduating from high school next week.  I'm going to send her a check but wanted something cute and handmade to put it in.  I realized only yesterday it needed to be mailed today or it would be too late after I get back from my trip.  She's really athletic and active, so I hope she likes the green with black/grey racing stripes.  The inside is the two different grey prints.


But the post title actually refers to a fun just-for-me project I did last Sunday afternoon.  Not sparkly red (or silver) shoes, but just as good.  My friend Linda mentioned the other day that target had cute suede wedges on sale for 50% off.   I went by and picked up a pair, but they were a pretty boring solid greyish beige, so I decided to color them with my magical multi-colored sharpie pack (I had a before pic but it was on the aforementioned missing SD card).  It worked like a charm.  I used masking tape to block off areas and then just colored them in.  I love them, so much better than just plain.


And here are a couple with my lovelies, because all craft pictures are better with gratuitous inclusion of dogs.


Don't they look innocent!
Hope you all have a good weekend!

Monday, April 30, 2012

Wannabe tutorial: iPad case

Last year sometime I made a pouch for Mike's iPad at a time when he had temporarily switched over to some other tablet and given me the iPad.  I figured he'd get tired of the other tablet soon enough and want the iPad back, so I thought I wouldn't make the pouch too bright so it would be useful even to him.  I chose blues and turquoises, but even then he said it was too girly.  When he inevitably decided he was switching back to the iPad, the blue pouch got put in a drawer.

Well this spring Mike got the new iPad 3 the very second it came out and so gave me his iPad 2 for good.  I got back out the blue pouch but wasn't too crazy about it.  For one thing, I'd made it big enough to also carry the bluetooth keyboard he has, but I hardly ever use that and without it the pouch is too big.  For another thing, I wanted a case that the iPad could stay in all the time as opposed to something that you took the tablet in and out of for use.

I decided to make a case for it (way girly this time) and figured I'd do a tutorial along the way.  I've never done a tutorial before, but I thought this might be a good time.  However, I encountered many weird difficulties along the way and am not certain about the fit of a few things, so I hesitate to call it a real tutorial.  More of a this-is-how-I-did-it-follow-along-at-your-own-peril kind of thing.  Make sure you read through first so you can learn from my mistakes.

I started with an iPad 9 1/2" tall, 7 3/8" wide, 3/8" thick.  Mine already had a slim skin on it, so yours may be smaller.  I cut out the following pieces:

2 pieces of fabric (exterior-dahlias and interior-grellow flowers) H + 1 1/8" x  2W + 5" (10 5/8" x 19 3/4")
2 pieces of stiff double sided fusible interfacing for front and back (like for fabric bowls) H + 1/2" x W + 1/2 " (10" x 7 7/8")
1 piece of stiff double sided fusible interfacing for frame H + 5/8" x W + 1/2" (10 1/8" x 7 7/8")
1 piece of stiff double sided fusible interfacing for closure flap (not actually in the picture since I didn't remember to cut it out at the beginning) H + 1/2" x 2" (10" x 2")
1 piece of fabric (frame) Height of frame interfacing + 3/4" x Width of frame interfacing + 3/4" (10 7/8" x 8 5/8") 
1 long piece of fabric (trim-grellow stripe) 2" x width of long piece (2" x 19 3/4")


I started by turning under the two edges of the long piece of trim and topstitching it down to my exterior fabric piece.  I then sewed the two large pieces of fabric together on three sides, leaving one short side open (right sides together) and curving slightly around the corners.


After turning and pressing, I slid one big piece of interfacing inside the pillowcase, and placed two skinny refrigerator magnets between the fabric and the interfacing on the exterior side.  The idea was that there would be magnets there and on the interior side of the flap closure to hold it closed.  After lining up the magnets, I ironed the fusible into place inside the pillowcase according to the instructions on the fusible.  I then lined up the next large piece of fusible inside the pillowcase, being sure to leave about 3/8 of an inch between the two pieces (see blue lines below) and fused again.  I then took the third, smaller piece of fusible and lined it up inside the pillowcase, lined up the other two magnets, this time between the fusible and interior fabric and fused the final piece of interfacing.  It's important to fold in the raw edges before doing the final fusing (there will be plenty of width of fabric to turn under) so they don't stick unfinished.  I then topstitched along the folded in edges to hold it all together.


Here things began to go awry.  At this stage, you should have basically a folder with a magnetic flap closure. I however, had a folder with a flap closure that did not stay closed.  The magnets were just not strong enough.  I was really hacked because I'd wanted a flat smooth closure, but it just wouldn't stay closed.  I was so aggravated I stopped taking pictures for a while.  To fix it, I ripped out all the top stitching, pulled all the fusible apart and installed two magnetic snaps, one on each corner.  I then refused and re-topstitched, but the snaps felt like they were pulling the fabric away from the fusible so I then sewed around them with my skinny zipper foot to strengthen the area.


The next step was to make the frame for the iPad to slide into.  I took the extra piece of interfacing, rounded the corners and cut out a frame in the middle, including a small cut out for the center button.  I used the other piece of fabric to wrap around the frame (after cutting out the middle).  Once I had the fabric wrapped around the frame, I fused it down and then top stitched around the outside and inside of the frame..


The next step was to attach the frame to the folder case.  I top-stitched the frame to the case, being careful to line up the edges (since the frame is bigger than the case to accommodate the thickness of the iPad).  

When stitching the frame on, I left the following areas open:
1. the entire left side (to slide the iPad in) 
2. the center of the bottom (to plug in the charger)
3. the top of the right side (to access the volume buttons)
4. the left and right of the top (to access the headphone jack and the sleep button

After that, I slid my iPad in and -abracadabra-  iPad case.  All the blue marker is wash away, I just forgot to get it erased before taking the pictures.  


A few things I don't care for to keep in mind if you decide to make one (you can see most of them in the above pictures).  

1. The magnetic buttons are fairly thick which makes the whole thing not quite as sleek as I'd like.
2. I made the frame a bit bigger than the folder part to accommodate the thickness of the iPad, but it kind of bubbled up in the middle.  I'd make it a smidge shorter if I were to do it again.
3.  The frame kind of buckles a bit around the inside.  This seems to be because the interfacing in the frame is flat while the frame really should have a 90 degree bend, i.e. up the side of the ipad then over the front.

I've now used the case for about 5 days and I'm enjoying it.  It's plenty functional and I adore the fabrics.  Problems #2-3 above seem to be partly resolving with time, I think it's just wearing in.  Let me know how it goes if you guys make a case like this!


Monday, April 23, 2012

Not-so-quick Napkins

I'm still working on Seymour, but thought I'd take a break to do a quick project.  I loved Rebecca's (from SewFestiveHandmade) idea to make napkins out of some of your fun prints which are unlikely to make it into quilts.  I have bunches of those,  bold, graphic prints that I adore, but which don't really fit into most of my quilts.

I decided I'd make napkins out of some of them, thinking it'd be a quick, easy project.   I thought it would be fun to have mixed prints so Mike and I would always know which napkin was whose.  I cut my fabric into 10.25" squares simply because that led to 4 napkins in a width of fabric.  I later realized that's a bit small for dinner napkins, but they're ok.

All I was going to do was hem the stupid squares.  Turned out to be the most wretched project!  I hemmed two sides of each napkin and then the other two.  My Janome absolutely would not sew over the corners without gumming up.  Because the hems were narrow, there was nothing to pull or push, and every corner got all knotted up.  I thought about trying my Singer 201, but I couldn't even get it to sew and I still have no idea what's wrong with it.

I finally got them finished and I think they're pretty cute, but not quite as carefree a project as I anticipated.  Mike will be the grellow Amy Butler ones, and I'll be the blue and pink dahlias.


You guys do any recent way easy projects that weren't?